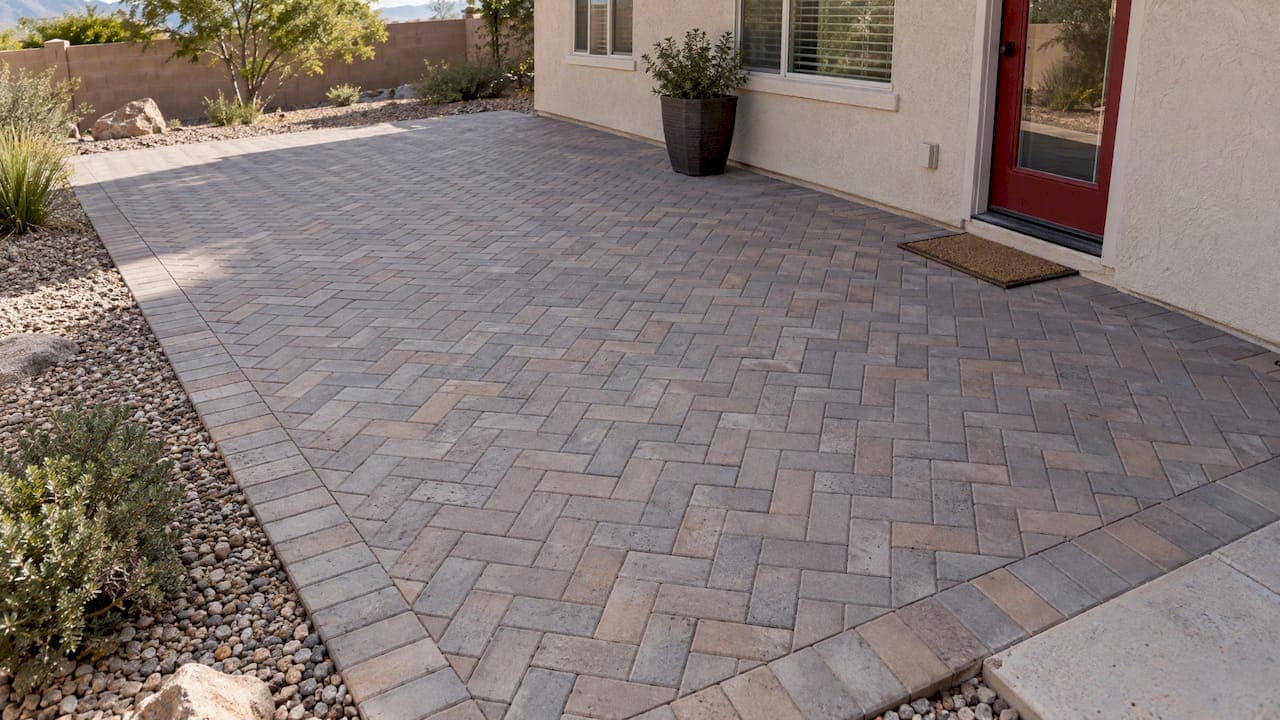
A herringbone paver pattern lays rectangular pavers in an interlocking zigzag, either at 45 degrees or 90 degrees to each other. It is the strongest common layout for surfaces that carry cars, and it looks good on patios and walkways too. The tradeoff is more cutting, more waste and more labor than a straight pattern. This guide covers how the pattern works, which version to choose, what it adds to a budget and what has to happen under the pavers for it to last.
TL;DR
- Herringbone locks pavers together in every direction, which is why industry guidance recommends it for areas with vehicle traffic.
- The 45-degree version looks more dynamic and suits driveways. The 90-degree version is simpler to read and suits patios and walkways.
- Plan to order roughly 10 to 20% extra material because of the angled edge cuts, against 5 to 10% for simple patterns.
- Expect herringbone to add 10 to 20% to labor time compared with a straight pattern.
- No pattern rescues a weak base. Compaction, aggregate depth and edge restraints decide how long the job lasts.
Table of Contents
- What a herringbone paver pattern is
- 45-degree vs. 90-degree herringbone
- Herringbone vs. running bond
- Paver patterns for driveways
- What herringbone adds to cost
- Perspective: what we tell homeowners about herringbone
- Installing herringbone: what has to be right
- Is herringbone outdated?
- Questions to ask a contractor before you sign
- Planning a herringbone project with us
- FAQ
- Sources
What a herringbone paver pattern is
Each paver sits at an angle to its neighbors, so the joints never run in a straight line across the surface. In a 90-degree herringbone, the pavers meet at right angles and form a series of L shapes. In a 45-degree herringbone, the whole field is rotated so the zigzag runs diagonally to the edges of the patio or driveway.
The pattern is usually made with rectangular pavers at a 2:1 length-to-width ratio, such as 4 by 8 inches. The pavers also have to be dimensionally consistent. Even small variations between units add up across a pattern that depends on each piece sitting tight against the next.
Why interlock matters
In paving terms, interlock is the inability of a paver to move independently from its neighbors. A herringbone layout helps because a tire pushing or braking on one paver sends force into several units at different angles, not along one continuous joint line. Straight patterns like running bond have joints that line up in one direction, so they are more prone to gradual shifting where vehicles turn and brake.
That is also why the pattern is the traditional choice for driveways. Belgard, a paver manufacturer, describes a herringbone set at 45 degrees to the garage as the strongest and most traditional driveway option.
45-degree vs. 90-degree herringbone
Both versions interlock. The choice is mostly about where the surface is, how it is used and how much cutting you want to pay for.
| 45-degree herringbone | 90-degree herringbone | |
|---|---|---|
| Look | Diagonal, more movement | Straight, more orderly |
| Best for | Driveways, entries, large open patios | Patios, walkways, narrow paths |
| Edge cuts | More, because every border course meets the edge at an angle | Fewer, because the pattern squares up to straight edges |
| Waste | Toward the high end of the 10 to 20% range | Often lower than 45 degrees, but still above a straight pattern |
| Labor | Highest of the common patterns | Moderately above running bond |
For a driveway, we generally point homeowners toward the 45-degree layout, set at an angle to the garage door or direction of travel. For a walkway, 90 degrees often looks cleaner because the pattern runs parallel to the path and the edges stay tidy. On a patio next to the house, either works. Pick the one that complements the lines of the building.
Herringbone vs. running bond
Running bond sets pavers in staggered rows, like brickwork. It goes down quickly, wastes less and costs less to install. On a patio that sees chairs and foot traffic, it performs well.
Herringbone earns its premium where horizontal loads are high: driveways, parking pads, and aprons where cars turn. CMHA guidance recommends it for all areas subject to vehicular traffic, because it spreads lateral forces across multiple units and provides stronger horizontal interlock than linear patterns.
A practical way to decide:
- Driveway or any surface a vehicle will turn on: herringbone.
- Large patio, foot traffic only, tight budget: running bond is a sensible way to save labor with little loss in function.
- Small patio or walkway where looks lead: herringbone, in whichever angle fits the space.
Paver patterns for driveways
A driveway puts more demand on the pattern than any other residential surface. The pavers also matter. For vehicular areas, CMHA technical guidance calls for a minimum paver thickness of 3 1/8 inches (80 mm) and an aspect ratio of 3:1 or less, which keeps units from cracking or rocking. Standard concrete pavers reach about 8,000 psi compressive strength per the same source.
If you want a different look, you can use herringbone as the field and add a soldier course border or a contrasting band. Borders look sharp and also give the herringbone a clean finishing edge, though they add cuts and labor. Keep color contrast subtle if you are watching costs.

What herringbone adds to cost
Herringbone costs more for two reasons: more material and more labor.
Material. Edge pavers must be cut at angles, and many offcuts cannot be reused. Plan on 10 to 20% extra instead of the 5 to 10% typical for simple patterns. Curves and small, irregular shapes push you toward the top of that range.
Labor. One 2026 cost guide puts professional concrete paver patio installation at $14 to $32.50 per square foot, with herringbone adding 10 to 20% to labor time because of the extra custom cuts. The same guide lists labor as 30 to 50% of a quote, so the pattern you choose moves the total noticeably but not wildly.
Our published range for Paver Patios & Walkways is $8,000 to $25,000 per project, depending on size, pattern, materials and site conditions. For a fuller breakdown by patio size, see our paver patio cost guide.
Worked example
Take a 300-square-foot patio. At the guide's $14 to $32.50 per square foot range, that is $4,200 to $9,750 before any site-specific extras. If the pavers cost, say, $5 per square foot, ordering 15% extra instead of 7% means about 24 more square feet of material to buy. Run your own numbers: the waste percentage is applied to the area, not the budget. If you are working from plans, digital plan takeoff tools can quantify areas and edge lengths so the extra material estimate is not a guess.

Perspective: what we tell homeowners about herringbone
We build driveways, patios, retaining walls and outdoor kitchens with our own licensed crew, and we manage every phase without handing it off to subcontractors. That shapes how we talk about patterns. A pattern decision touches the estimate, the base, the schedule and the edge details all at once, and when one team owns all of it, those choices get made together.
Our advice is plain. If a vehicle will drive on it, choose herringbone and spend the money on the base first. If it is a patio, choose the pattern you like looking at and be honest about the cutting cost. We would rather you pick a simpler pattern on a properly built base than a complex pattern on a rushed one. In Utah, freeze-thaw cycles punish weak subgrades fast, and we plan for that on every job.
The other thing we watch is layout. Herringbone is unforgiving: if the first rows drift off true, the error shows up as gaps and sliver cuts at the far edge. A good installer sets string lines and checks the pattern against them as the field grows.
— Jake
Installing herringbone: what has to be right
This is not a DIY tutorial, but knowing the sequence helps you judge a bid.
- Excavate and compact the subgrade. Soft or wet spots get corrected before any stone goes in.
- Build the aggregate base in compacted lifts. CMHA-based guidance calls for 4 to 6 inches for patios and 8 to 12 inches for driveways, though soils and loads vary. We cover this in detail in our guides to patio base compaction and driveway base preparation.
- Screed the bedding layer. It should be smooth and uniform, and never walked on afterward.
- Set edge restraints. Rigid restraints keep the pattern from spreading sideways. In a herringbone, this is how the interlock stays tight over years.
- Lay the pattern from a string line. Start from a true reference, check alignment frequently and keep joints consistent.
- Cut the edges, compact and sweep in jointing sand. Compaction seats the pavers and the sand locks the joints.
On large commercial or machine-laid jobs, factory cubes of pavers are placed by equipment, and crews manually replace half-pavers around the perimeter with full units to complete the interlocked pattern. Residential jobs are usually hand-laid.
Drainage deserves its own check. Soil type, slope and where the water goes decide whether the base stays stable. Our paver patio drainage checklist walks through it.
Is herringbone outdated?
No. It has been used for centuries on streets and courtyards, and it keeps showing up because it works. It suits traditional homes and contemporary ones alike, depending on paver color and finish. Large-format pavers in a neutral gray look modern. Tumbled brick-style units in warm tones look classic. The pattern stays constant while the material changes the style.
Questions to ask a contractor before you sign
- Which paver thickness and size are you quoting, and are they rated for vehicles if this is a driveway?
- How deep is the compacted base, and how will you handle soft spots in the subgrade?
- What waste percentage did you build into the material order?
- How will you keep the pattern square, and how are the edge courses finished?
- Who is on site, and are they your employees or subcontractors?
- How will maintenance work? Our spring hardscape maintenance checklist is a good starting point.
Planning a herringbone project with us
If you are in Utah and want a patio, walkway or driveway approach laid in herringbone, our Paver Patios & Walkways service is where to start. Our in-house crew handles the work from estimate to completion, with one point of contact throughout. If you are comparing paver with poured options for a driveway, we also do concrete driveways. Tell us the size, the use and the look you want, and we will bid the pattern honestly, including what it costs in cutting and labor.
FAQ
What is the 45-degree herringbone paver pattern?
It is a herringbone layout rotated so the zigzag runs diagonally to the edges of the surface. Pavers still interlock at right angles to each other, but the whole field is turned 45 degrees. It is a common driveway choice and produces more edge cuts than a 90-degree layout.
What is the most popular paver pattern?
Running bond and herringbone are the two most common. Running bond is faster and cheaper to install, while herringbone is chosen for driveways and for a more decorative look. Which is more popular depends on the project type.
How much extra paver material do I need for herringbone?
Plan on 10 to 20% extra, compared with 5 to 10% for simpler patterns. Small or curved areas need more. Ask your installer what percentage is in the quote.
Can I use herringbone on a patio, or is it only for driveways?
You can use it anywhere. It is required in practice only where vehicles drive, but it works well on patios and walkways too. The cost is higher because of the cutting, so some owners use running bond for the field and keep herringbone for borders or feature areas.
Sources
- Structural Design of Interlocking Concrete Pavement for Roads and Parking Lots, CMHA
- Interlocking Concrete Pavements, CMHA
- Tile and Paver Layout Patterns, Inch Calculator
- Paver Patio Cost in 2026, BuildCalcHub
- Best Paving Stones, Patterns & Designs for Driveways, Belgard