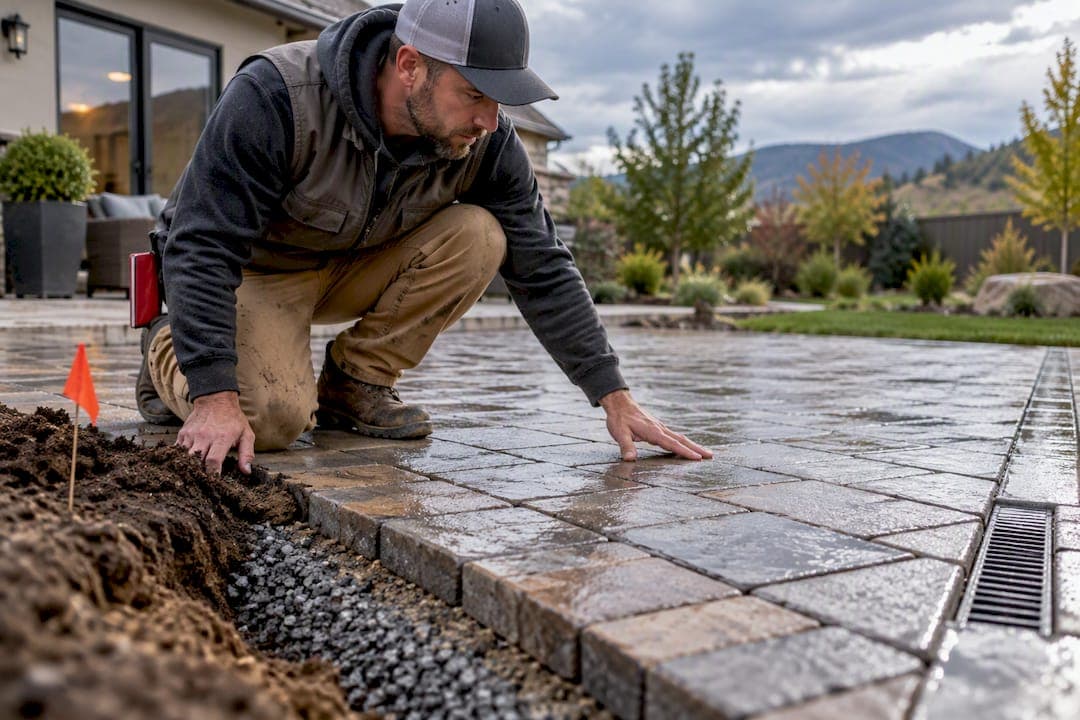
A well-drained paver patio needs three things working together: a positive slope that carries water away from the house, an open-graded base or a properly designed permeable system, and an outlet that lets water actually leave the site. Check yours with a hose or watch it after a storm: if water pools for more than a day or two instead of soaking in or running off, something in that chain is broken. Widespread pooling, a slope tilted toward the foundation, or a high water table are all signs to call a contractor rather than patch it yourself.
TL;DR:
- Proper drainage systems for paver patios depend on site conditions, with permeable pavements and installed outlets reducing pooling issues caused by high water tables or improper slopes.
- Achieving effective drainage requires a minimum slope of 1.25% to 1.5%, along with a well-designed system that includes an open-graded base and a validated outlet point.
- Inadequate drainage often results from skipped outlet planning, native soil used as backfill, or incorrect slope direction, all of which may need professional correction.
- Routine maintenance such as inspecting, vacuuming joints, and flushing out drains every six months prevents sediment buildup and ensures systems stay functional.
- Contractors verify proper drainage through visual inspection, cleanouts, and observation wells, emphasizing the importance of integrating drainage design into the initial construction.
Table of Contents
- Which drainage systems actually work for paver patios
- Design rules and site checks before you commit to a system
- Step-by-step installation checklist for a patio that drains
- Diagnosing and fixing drainage that's already failing
- Materials and components that make or break the system
- Keeping the drainage working: maintenance and inspection
- What contractors actually check on a paver patio
- Get your paver patio drainage fixed the right way
- Where to go for the technical details
- Sources
- FAQ
Which drainage systems actually work for paver patios
Most paver patios rely on one of four approaches, and picking the right one depends on your soil, your slope, and how much water the site handles.
- Surface-only drainage moves water across the paver face toward a low edge; it works on sites with decent existing grade and needs a consistent, deliberate slope rather than a general slant.
- Channel or trench drains are surface inlets set into the patio at low points or thresholds; they catch water before it reaches a door or foundation, but they only work if the outlet pipe actually goes somewhere.
- Perimeter or French drains sit below grade around the patio edge and intercept subsurface water, which matters most on sites with clay soil or a high water table.
- Permeable interlocking concrete pavement (PICP) lets water infiltrate through the joints into an open-graded stone reservoir below, and comes in full, partial, or no-infiltration designs depending on how much water the native soil can absorb.
The FHWA's guidance on permeable pavements treats the whole system, surface, reservoir, subgrade, underdrain, and outlet, as one design, not separate parts bolted together. Skip any one piece and the rest can't compensate.
Design rules and site checks before you commit to a system
Get these checks right before you pick a drainage system, because they decide which option will actually work on your site.
- Measure your slope first. ICPI guidance on patio grading recommends a minimum slope around 1.25% to 1.5% to move surface water reliably, with a practical upper limit before the surface starts feeling unstable underfoot or icy in winter.
- Check infiltration. Dig a small test hole, fill it with water, and watch how fast it drains. Standing water after an hour or two often signals clay soil or a high water table, both of which point toward an underdrain rather than full infiltration.
- Map existing drainage before you dig. Note where downspouts, gutters, and any ditches already send water, and route your patio's outlet away from those paths rather than toward your own foundation or a neighbor's yard.
- Confirm your outlet is real. A daylighted outlet, one that empties visibly above grade at a lower point, or an approved tie-in to a storm system, is often required by local code and is the difference between a drain that works and one that just moves the puddle underground.
Pro Tip: Walk your yard during or right after a heavy rain before you design anything. Watching where water actually goes tells you more than any grading plan on paper.
Step-by-step installation checklist for a patio that drains
Build in this order, and don't skip steps to save a weekend.
- Survey the site and stake finished elevations, planning your outlet path and cleanout locations before any digging starts.
- Excavate to the designed depth, and correct any soft, wet, or spongy subgrade you find. If the native soil won't support a stable base, bring in a contractor rather than building on top of the problem.
- Lay separation geotextile over the subgrade where soil conditions call for it, based on the ICPI's fabric selection guidance.
- Place open-graded aggregate in controlled lifts, compacting each layer before adding the next. Full details on getting this step right are covered in our patio base compaction guide.
- Install any underdrain or edge drain sloped toward the outlet, wrapped in geotextile to keep fines from clogging the pipe.
- Add the bedding course, set the pavers with edge restraints locked in, and fill joints with the appropriate stone chips or stabilized sand.
- Compact the finished surface and test it with a hose or by watching the next rain.
A few things trip up even careful DIYers:
- Skipping the outlet plan until after the base is in, which forces expensive rework.
- Using native soil as backfill instead of open-graded aggregate, which kills drainage capacity.
- Setting pavers before confirming the underdrain slopes the right direction.
Diagnosing and fixing drainage that's already failing
If your existing patio holds water, the fix depends on how widespread the problem is.
- Isolated low spots usually mean a small area settled. Lift the pavers, rebuild the base under that section, and reset them; this is a manageable weekend project for most DIYers.
- A clogged outlet shows up as water backing up near a drain inlet or cleanout even though the rest of the patio looks fine. Clear the pipe or channel before assuming the whole system failed.
- Reversed or inadequate overall slope means water pools broadly rather than at one spot, and that calls for regrading and rebuilding, not a patch.
- Persistent saturation across the base, especially in clay soil or where the water table sits high, usually means an underdrain needs to go in where there wasn't one before.
Pro Tip: An outlet you can't inspect or clear is often the real point of failure. Field guidance on subsurface drains notes that a blocked or hidden outlet renders an otherwise well-built drain useless, so build in a visible cleanout from the start.
Tying a repaired outlet into a storm system or daylighting it to a new discharge point may require a permit, so check with your local building department before finalizing the path.
Materials and components that make or break the system
The parts under the surface matter more than the pavers themselves.
- Open-graded aggregate for the reservoir and bedding course should have enough void space, typically 25% to 35%, to store water temporarily, according to FHWA specifications for permeable pavement.
- Geotextile fabric needs to match your soil: woven, high-permittivity fabric for silty or clay subgrades, and non-woven needle-punched fabric for stable sand or gravel, per ICPI's geotextile guidance.
- Perforated underdrain pipe typically runs 4 to 6 inches in diameter, sloped consistently toward the outlet, with a cleanout at the high end.
- Joint fill for PICP uses small stone chips to preserve permeability, while conventional pavers use stabilized sand, and both systems need solid edge restraints or the joints and base will migrate over time.
Keeping the drainage working: maintenance and inspection
Drainage systems degrade with sediment, not age, so the maintenance schedule matters as much as the install.
- Inspect after major storms, and again each spring and fall; permeable systems benefit from a professional check roughly every six months.
- Sweep or vacuum paver joints to remove fine sediment before it works down into the reservoir. Regenerative air or true vacuum equipment clears more than a shop vac on heavily used patios.
- Flush underdrains and outfalls periodically, and watch cleanouts for standing water, a sign the pipe is partially blocked.
Sediment buildup gradually reduces how fast a permeable surface drains, and the FHWA recommends routine vacuum cleaning along with ASTM C1781 surface infiltration testing to catch the decline before it becomes a standing-water problem. For seasonal tasks beyond the drain system itself, our spring maintenance checklist for hardscape and concrete covers the rest of the patio.
What contractors actually check on a paver patio
The most expensive mistakes to fix later are invisible at install: base depth that's a few inches short, no real outlet, or the wrong geotextile for the soil. Contractors test drainage with cleanouts and observation wells rather than guessing, and a licensed general contractor coordinates grading, base work, and paver installation as one crew rather than handing the job between subcontractors. If you're requesting an estimate for a drainage fix, photos of the pooling area, the patio's dimensions, and a description of when the water shows up will get you a faster, more accurate quote.
— Jake
Get your paver patio drainage fixed the right way
The company builds and repairs paver patios in-house, from grading and base work through final jointing, so drainage gets designed into the project rather than patched on afterward. If your patio already holds water or you're planning a new one, request a free estimate through our paver patio and walkway page and have your patio's size, a few photos of the trouble spots, and a quick description of the water issue ready to share. 

Where to go for the technical details

For specifications beyond this guide, the FHWA's permeable pavement tech brief and PICP design guidance cover reservoir sizing and underdrain design in depth, while PavingExpert's filter drain page walks through simple on-site drainage fixes.
Sources
- Tech Brief: Use of Permeable Pavements (FHWA)
- Permeable Interlocking Concrete Pavement (FHWA)
- The Use of Geotextile in Permeable Pavement (ICPI blog)
- SUDS - Drive and Patio Infiltration Drain (PavingExpert)
FAQ
Do you need drainage under a paver patio?
Yes, most paver patios need a drainage layer beneath them, typically an open-graded aggregate base that lets water move down and away rather than pooling under the pavers. Sites with clay soil or a high water table often need an underdrain added to that base as well.
What does proper drainage on a paver patio look like?
Proper drainage means the surface slopes consistently away from the house, at roughly 1.25% to 1.5% at minimum according to ICPI's patio grading guidance, and water either runs off that slope or infiltrates through a permeable system into a stone reservoir below. Either way, there needs to be a clear outlet where excess water leaves the site.
What do you put under pavers for drainage?
An open-graded aggregate base, sized for adequate void space, sits under the pavers to store and move water, often with a geotextile fabric separating it from the native soil. Where the subgrade is clay or saturated, a perforated underdrain pipe wrapped in geotextile is added within that base.
How do you add drainage to an existing paver patio?
For a small low spot, lift the affected pavers, rebuild the base underneath, and reset them; for a clogged outlet, clear the pipe or channel drain before assuming a bigger problem. If the whole patio slopes the wrong way or the soil stays saturated, that usually calls for regrading or adding an underdrain, which is a bigger job worth hiring a contractor for.