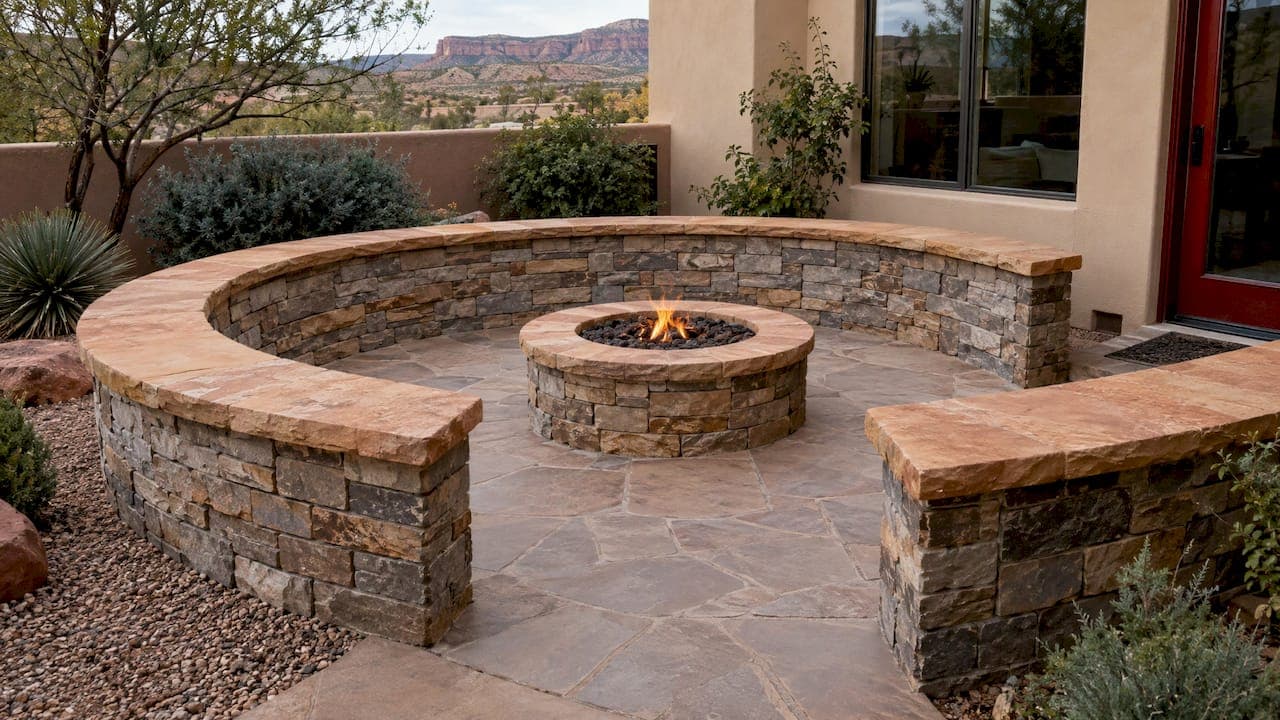
A good fire pit seating wall sits about 3 to 4 feet back from the pit, stands roughly chair height, rests on a compacted gravel base that drains, and is built with noncombustible materials that clear your local fire rules. Get those four things right and the wall will last for decades. Get one wrong and you end up with a wall that heaves, scorches your guests or breaks a setback rule. This guide walks through each decision in the order you will face it.
TL;DR
- Plan the seat wall roughly 3 to 4 feet from the fire pit edge, and leave one or two sides open for access and extra chairs.
- Keep the pit itself near 36 to 44 inches inside diameter and about 12 inches above grade, with the seat wall at a comfortable chair height.
- Build on a compacted ¾-inch gravel base in a level trench, finish with capstones, and plan drainage before you stack a single block.
- Setbacks differ by town (5 to 25 feet from structures in the ordinances we reviewed), so check your own city or county fire rules first.
- Build the wall, patio and pit as one coordinated project, not three separate jobs.
Table of Contents
- How far should the seat wall sit from the fire pit?
- What height and depth should the wall be?
- Materials that handle fire and weather
- Building a stable seat wall: base, drainage and cap
- Safety clearances and local fire rules
- Sequencing the wall, patio and fire pit
- Our perspective
- What it costs to build with us
- Plan your fire pit seating area with us
- FAQ
- Sources
How far should the seat wall sit from the fire pit?
Belgard's homeowner guidance suggests seating about 3 to 4 feet from the pit so people have room to walk and are warm without crowding the flames. Tighter than that and knees, shoes and clothing end up too close to the fire. Much farther and the circle stops feeling like a gathering place.
A few points shape the final number:
- Fuel type. Wood throws more heat and sparks than gas, so a wood-burning pit wants the generous end of the range. Our gas fire pit installation guide covers how gas changes the layout.
- Pit size. This Old House notes that common fire pits have an inside diameter of 36 to 44 inches and stand about 12 inches above grade. A bigger pit pushes the wall outward. See our fire pit size guide for how to pick.
- Wind. Belgard also recommends checking wind patterns before installation. Put the open side of the wall where smoke is least likely to blow across the seats.
- Access. Belgard says seat walls can be left open on one or two sides for furniture and easier movement around the fire. An opening is also where you carry in firewood and tools.
Choosing the shape
A curved wall that follows the pit's outline keeps everyone facing each other and works well for conversation. A straight or L-shaped wall suits a patio edge, where the wall can also frame the space. A partial arc, about a half to two thirds of a circle, is the most common layout because it leaves room to enter and still reads as a room.
As a rough planning aid, count about 24 inches of wall per seated person. A half circle with a 4-foot radius to the wall's inside face has an arc of about 12.5 feet, which seats five or six adults. If you regularly host more, add movable chairs in the open side rather than lengthening the wall.

What height and depth should the wall be?
Think of the wall as a bench. Most people find a seat comfortable at about the height of a dining chair, which is roughly 16 to 18 inches, with a cap deep enough to sit on rather than perch on. A cap about 16 inches deep or more gives room for sitting, and a wider cap also doubles as a ledge for drinks. If guests will sit on both sides or lounge sideways, go deeper.
Two cautions on height. Keep the seat wall lower than you would a freestanding screen so seated guests can still see the flames and reach comfortably. And do not confuse the seat wall with the pit wall. The pit itself usually stands near 12 inches, as noted above, while the seat wall is a separate structure with its own footing.
If the wall holds back soil
On a sloped yard, a seating wall often doubles as a retaining wall. Once a wall holds back soil or supports a grade change, it needs to be engineered and built as a retaining wall, with proper drainage behind it. That is a different job from a freestanding bench. We build both, and our retaining wall work is where a sloped seating area usually starts.
Materials that handle fire and weather
The seating wall and the fire ring have different jobs, so they can use different materials.
For the fire pit lining, use materials made for heat. Fire brick (also called fire clay brick) is the standard liner, and a steel ring is a common flame barrier inside it. Avoid porous stone, river rock and stones that hold water near direct flame, because trapped moisture can turn to steam and crack the stone. Standard concrete block is not meant for a firebox, since it can spall when heated.
For the seat wall, which sits farther from the flames, you have more options:
- Segmental retaining wall block. Engineered to interlock, glue and cap, and easy to curve. Manufacturers such as Unilock publish seat-wall assembly instructions that call for glued courses and large coping with an overhang.
- Natural stone or stone veneer over block. Gives a custom look, with the block core carrying the load.
- Brick or masonry. A classic look that pairs well with an existing house. Our masonry crew can match it.
- Poured concrete with a veneer or cap. Strong and permanent, and a good choice when the wall is also a footing for a pergola or outdoor kitchen.
Whichever you choose, pick a cap that is noncombustible, sheds water and overhangs the face slightly so rain drips away from the wall.
Surface around the pit
The ground between the pit and the wall takes the most heat and foot traffic. Flagstone and granite handle heat well, and pavers designed for patios are common too. If you want a smooth, level floor, tie it into a paver or concrete patio so the pit, floor and wall read as one design. Keep loose mulch and dry grass away from the pit edge.
Building a stable seat wall: base, drainage and cap
Most failed seat walls fail underground. Frost, water and soft soil move the base, the courses open up, and caps crack. The steps below follow standard manufacturer and homeowner guidance, and the details depend on your soil and climate.
- Call 811 first. Utility locating is free and should happen before any excavation. Harbor Soils recommends calling 811 and then marking the circle from a center stake and string.
- Mark the layout. Use a stake at the pit center and a string to scribe the pit and wall arcs. Paint the lines, then look at them from where people will sit.
- Excavate a level trench. This Old House says to excavate a level trench and fill it with six inches of ¾-inch drainage gravel, compacted and checked for level.
- Fix soft spots. Allan Block's installation guide says the foundation soil must be good-quality compactible material, and soft soil should be removed and replaced with crushed rock.
- Compact in lifts. Thin layers compact better than one thick one. Cultivating Flora's Virginia guide suggests crushed stone compacted in 2-inch lifts over geotextile fabric. Our patio base compaction guide shows what proper compaction looks like.
- Set the first course dead level. Every later course follows it. Stagger joints and use block adhesive between courses.
- Cap it. Unilock's seat-wall guide specifies 14×19-inch coping with a 1.75-inch overhang on each side for that system. Follow the manufacturer's numbers for the block you buy.
For the pit's own base and fill, see our fire pit base guide.
Drainage
Water is the real enemy of a seating wall. The Home Depot's in-ground fire pit guide describes a central drainage hole filled with gravel for well-draining soil and a sloped trench with perforated drainpipe for poorly draining sites. The same logic applies to a wall: give water a path out from behind and beneath it.

If your yard pools after storms, solve that first. Our paver patio drainage checklist walks through soil, slope and outlet, and this overview of storm drain system basics explains where runoff goes once it leaves your yard. For a wall near a house, grading and foundation drainage matter even more, which is where foundation excavation and drainage work comes in.
Safety clearances and local fire rules
There is no single national setback. Cities and counties write their own, and the numbers vary a lot. Here is what a few published ordinances say:
| Town | Requirement for fire pits |
|---|---|
| Wilkesboro, NC | At least 5 feet from property lines and 15 feet from structures, including decks |
| Elmhurst, IL | Permit for open burning, at least 15 feet from structures, attended by a person over 17, approved extinguisher on hand |
| Miami Township, OH | At least 25 feet from structures or combustibles for recreational fires, with a 15-foot setback allowed for gas-fired pits |
| Edina, MN | Recreational fires registered online and contained in a ring, pit or similar device |
The lesson is to measure your seat wall layout against your own rule, and to measure to the wall as well as the pit if your code counts structures or combustible materials. In Utah, for example, Cedar City publishes its open burn requirements, including a ban on burning trash and yard waste inside city limits. Call your local fire department or building office before you finalize the layout, and ask whether a permit, a burn-day restriction or a fuel limit applies. Our fire pit clearance guide explains how to read these rules.
Some safe-use habits apply everywhere. The Home Depot's guide notes that strong winds can carry sparks, and advises keeping a hose or extinguisher nearby, never using lighter fluid, fully extinguishing the fire and covering the pit when it is not in use. If wind is a problem on your lot, our fire pit wind solutions checklist covers what to ask your contractor. Keep low branches and overhead lines clear too, as This Old House advises.
Sequencing the wall, patio and fire pit
The order of work matters more than most homeowners expect. A coordination guide from Projul lays out the typical landscape sequence: rough grading, underground utilities and drainage, fine grading, hardscape, irrigation, then planting and finish work. Retaining walls that support grades go in during or shortly after rough grading, while pavers and natural stone go in as late as practical.
For a fire pit seating area, that translates to:
- Grade the site and set drainage and any gas or electrical lines.
- Build the seat wall footings and any wall that holds back soil.
- Install the patio surface and tie it to the wall.
- Build the fire pit and set caps.
- Add irrigation, lighting and plantings last, so nothing gets dug up twice.
Split this among separate crews and you get gaps: the paver crew waits on the wall crew, the irrigation crew trenches through a finished edge, and no one owns the drainage. Define traffic routes before hardscape starts and protect finished surfaces from equipment, as the same guide advises.
Our perspective
Most seat wall problems we see are not design problems. They are coordination problems. Someone built the wall before the grading was settled, or the patio crew set pavers that the wall crew later had to cut around, or nobody planned where the water goes.
That is why we keep every phase in-house. Our licensed crew handles the excavation, the base, the masonry or block, the patio and the finish landscaping, with one point of contact from estimate to completion. A seat wall is a small structure, but it touches grading, concrete, stone and drainage at once, and that is exactly where handing off between subcontractors costs time.
We build for Utah's climate and codes, so we start with the base and drainage and the local fire rules, then work up to the stone and the cap. Decide what you want the space to feel like, and we will make the structure under it right.
Jake
What it costs to build with us
A seat wall is priced by its scope: length, height, materials, base work and whether it holds back soil. We quote fixed bids, so you know the number before work starts. For reference, our published ranges are $6,000 to $40,000 for retaining walls and $8,000 to $25,000 for paver patios and walkways. Outdoor kitchens run $15,000 to $60,000 when you want to build the whole entertaining space around the fire.
Plan your fire pit seating area with us
We design and build seat walls, paver patios, retaining walls and fire features as one project with one crew, so grading, drainage, masonry and finishing happen in the right order. Tell us about your yard and how you want to use it, and we will put the scope into a fixed bid. See our hardscape services or our paver patio contractor page to start.

If the site needs clearing first, we also offer excavation, grading and dumpster rental through a-to-zconstruction.com.
FAQ
How far should a seat wall be from a fire pit?
Plan roughly 3 to 4 feet from the pit edge to the seating surface for walking room and comfortable warmth, according to Belgard's guidance. Wood-burning pits do better at the farther end of that range. Always confirm your local code, because setbacks to structures and property lines are separate rules.
Can I use any stone or block for the fire pit and the seat wall?
No. Use fire brick and a steel ring for the firebox, and avoid porous stone or river rock near the flames because trapped moisture can crack them. The seat wall, which sits farther from the fire, can use retaining block, natural stone, brick or a veneered core with a noncombustible cap.
Do I need a permit to build a fire pit with a seating wall?
It depends on your city or county. Some towns require a permit or registration for fires and set minimum distances from structures, as the Elmhurst and Edina documents above show. Call your local fire department and building office before you build, and ask about the seat wall as a structure too.
Can a seat wall double as a retaining wall?
Yes, on a sloped yard, but it must then be designed and built as a retaining wall with a compacted base and drainage behind it. A bench-only wall can be simpler. Describe your slope to your contractor so the right wall type is priced.
Sources
- How To Build a DIY Fire Pit, This Old House
- Fire Pit Design Tips & Trends, Belgard
- U-Cara Multi-Face Wall System Installation Guide, Unilock
- Allan Block Round Fire Pit installation guide
- Fire Pit Area: Materials, Base Layers & Build Guide, Harbor Soils
- Steps to Build a Fire Pit Area, Cultivating Flora
- How to Build an In-Ground Fire Pit, The Home Depot
- Fire Ordinance, Wilkesboro, NC
- Outdoor Fireplace Permit Form and ordinance, Elmhurst, IL
- Outside Burning, Miami Township, OH
- Fire Permits & Policies, Edina, MN
- Open Burn Requirements, Cedar City, UT
- Construction Landscaping Coordination Guide, Projul