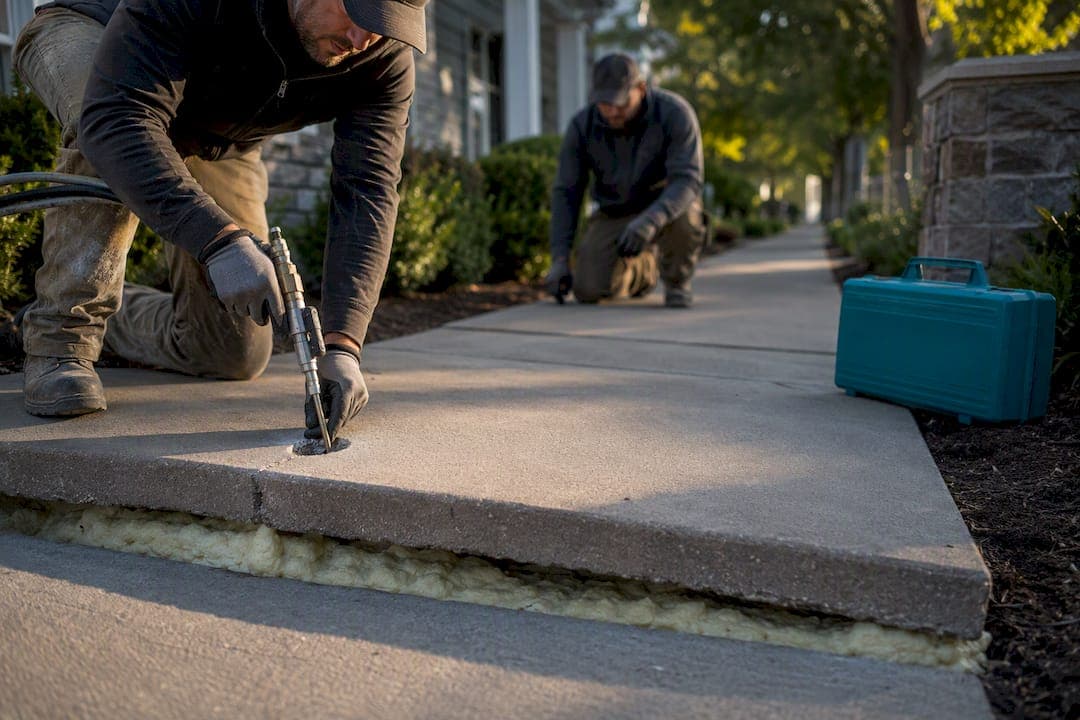
Most sunken sidewalks with an intact slab respond well to soil-stabilizing lift methods like polyurethane foam injection or mudjacking, which are faster and cheaper than tearing out concrete. Full replacement becomes necessary when the slab is cracked into pieces, the base is contaminated, or the panel can no longer transfer load evenly. Either way, check whether your city has a shared-cost sidewalk program before paying full price, and confirm permit rules first.
TL;DR:
- Most sunken sidewalks respond well to soil-stabilizing lift methods like foam injection or mudjacking, with foam often being faster and less disruptive.
- The key cause of sinking is soil issues such as settlement, washout, poor compaction, or tree roots, not the concrete itself.
- Full replacement is necessary when cracks are extensive, the slab is broken into pieces, or the subbase is contaminated, with repair choice depending on damage type.
- Costs vary: foam injection and mudjacking are generally cheaper than replacement, which includes demolition and new concrete, with timelines ranging from hours to days.
- Proper assessment, documentation, and matching the repair to the cause are critical, as well as checking local sidewalk programs to reduce out-of-pocket expenses.
Table of Contents
- Why sidewalks sink in the first place
- How to assess and measure a sunken sidewalk safely
- Repair options: mudjacking, foam injection, or full replacement
- DIY approaches and temporary repairs homeowners can attempt safely
- Costs, timelines, and permitting: what to expect
- How to choose and vet a sidewalk repair contractor
- Preventing the next sunken sidewalk
- Field notes from a working concrete crew
- What I would do if this were my sidewalk
- How A to Z Construction can help with sidewalk and slab repair
- Sources
- FAQ
Why sidewalks sink in the first place
A sunken sidewalk is almost never a concrete problem. It is a soil problem that shows up in the concrete. The slab itself usually stays intact while the ground underneath it settles, erodes, or washes away, leaving a void the concrete eventually drops into.
A few conditions cause most of the sinking homeowners see:
- Soil settlement and washout: loose fill soil compacts over time, or water erodes fine particles out from under the slab, leaving voids that the concrete falls into.
- Poor original compaction: sidewalks poured over an under-compacted base settle unevenly within the first few years.
- Drainage problems and freeze-thaw cycling: water that pools against a slab softens the soil below it, and repeated freezing and thawing pushes soil and concrete out of alignment.
- Tree roots: roots growing under a panel can lift one side while soil erosion drops the other, creating the classic seesaw effect.
- Utility trench settling: sidewalks poured over previously excavated trenches (for water, sewer, or gas lines) often sink along that trench line as the backfill settles.
Preventative maintenance, including sealing joints and correcting drainage before a slab drops, is far more cost-effective than waiting for structural failure that forces a full replacement. That single fact drives most of the advice in this guide: catch the cause early, and the fix stays small.
The cause also determines which repair actually works. A void from washout is a textbook candidate for foam injection, which fills the gap and stabilizes the soil at the same time. A panel cracked from a root pushing through the slab is a different story: lifting it back into place does nothing about the root still growing underneath, and the crack will likely return. Matching the repair to the cause, rather than just the symptom, is the difference between a fix that lasts and one you redo in three years.
How to assess and measure a sunken sidewalk safely
Before calling anyone, spend fifteen minutes documenting what you are looking at. Contractors will ask for this information anyway, and it helps you figure out whether this is a weekend fix or a hire-a-pro situation.
- Walk the length of the sidewalk and note every location where a panel has dropped, tilted, or cracked, along with any spots where water pools after rain.
- Check for a trip hazard by looking for a lip or gap between adjacent panels, since even a small vertical offset can catch a shoe or a walker's wheel.
- Measure the height difference between panels using a straightedge (a 4-foot level or a straight board) laid across the joint, then measure the gap underneath with a tape measure or ruler.
- Check the slope by setting a level on the panel to see whether it tips toward or away from the house, which tells you where water is likely draining.
- Look for undermining by tapping the slab near the edge of the sunken area. A hollow sound or visible void at the edge suggests soil has washed out from underneath.
- Photograph everything, including a wide shot of the whole panel, a close-up of the gap with a tape measure in frame, and a shot of any cracking or spalling.
Mark any panel with a noticeable vertical offset sufficient to pose a trip hazard with spray paint, a cone, or tape until it is repaired, as this indicates when a sidewalk becomes a liability risk rather than a cosmetic issue.
Pro Tip: Take your measurement photos in the morning or evening when low-angle light casts shadows across the offset. It makes height differences far easier to see and document than in flat midday light.

If a slab rocks underfoot, sounds hollow across most of its surface, or shows a crack that runs its full width, stop walking on it and call a contractor rather than attempting a DIY fix. Undermined slabs can shift further under load, and a panel that is barely hanging on the edge of a void is not something to test with your own weight.
Repair options: mudjacking, foam injection, or full replacement
Once you know the cause and have documented the damage, the choice narrows to three real options. Each one solves a different version of the problem.
Mudjacking, also called slabjacking, lifts a sunken panel by pumping a slurry of soil, cement, and sand through holes drilled into the slab. The material fills the void and pushes the panel back toward level. It has been used for decades, generally costs less per square foot than foam injection, and works well on slabs with straightforward settlement and a stable subgrade. The downsides show up over time: the slurry is heavy, which can cause new settlement in soft soil, the holes are larger and more visible than foam injection ports, and the process is messy, often leaving slurry runoff on the surrounding grass or landscaping. It is also a poor fit near tree roots, since the added weight can accelerate root-related lifting elsewhere in the panel.
Polyurethane foam injection works on the same lifting principle but uses a two-part expanding foam instead of slurry. The foam is injected through dime-sized holes, expands within minutes, and fills voids while compacting and stabilizing the soil around it. It installs fast and creates far less mess and landscaping disruption than mudjacking, which makes it a common choice for homeowners who want a quick, low-disruption fix. The foam is also lightweight, so it adds little extra load to already-soft soil, and it works in tight side-yard access where mudjacking equipment cannot reach. The tradeoff is cost per square foot, which tends to run higher than mudjacking, though the smaller footprint and faster labor often close that gap on small jobs. Neither lifting method fixes a slab that is already cracked into multiple pieces or resting on a contaminated or organic-laden subbase, since there is nothing solid left to lift evenly.
Full slab replacement is the answer when the panel itself has failed rather than just the soil underneath it. The FHWA's full-depth repair procedure outlines the standard sequence: mark the repair boundaries, saw through the full depth of the old concrete, remove the broken slab, prepare and compact a new subbase, place and finish new concrete, then cure it and seal the joints. Full replacement takes longer, costs more, and disrupts the surrounding yard more than either lifting method, but it is the only option that restores a damaged panel to full strength and lets you correct base problems that caused the sinking in the first place.
A related, less invasive option worth knowing about is the partial-depth repair, which addresses surface distress confined to the upper half of a slab, such as spalling or shallow scaling, without removing the whole panel. Partial-depth repairs work well for cosmetic damage, but when distress extends deeper into the slab, full-depth repair is the correct fix.
A few conditions push the decision firmly toward replacement rather than lifting:
- Multi-piece cracking: a panel broken into two or more separate pieces has no single surface left to lift evenly.
- Contaminated or organic subbase: soil mixed with old mulch, debris, or heavy clay does not compact reliably even after lifting.
- Active root intrusion: a root already pushing through the slab will keep growing after a lift, so the panel needs to come out to address the root directly.
- Load transfer failure: when adjoining panels no longer move together under weight, it signals a structural issue that lifting alone will not correct.
DIY approaches and temporary repairs homeowners can attempt safely
Some sidewalk problems are small enough to handle yourself, and knowing which ones is worth the fifteen minutes it takes to check.
Grinding down a lip, shaving a raised edge, or building a temporary asphalt ramp are all reasonable DIY moves for minor trip hazards, typically anything under a half-inch of vertical offset. A concrete grinder (rentable from most hardware stores) can shave down a raised edge in under an hour, and a cold-patch asphalt ramp costs a fraction of a repair and buys time until a bigger fix happens. Shallow surface spalls, where the top layer of concrete has flaked away but the slab underneath is sound, can be patched with a concrete resurfacer or repair mortar following the product's mixing and curing instructions.

Slab lifting is not a DIY project. Mudjacking and foam injection both require specialized pumps, precise drilling, and enough field experience to know how much material a void needs without overlifting or cracking the panel. Doing it wrong can crack the slab further, leave it unevenly supported, or push material into places it does not belong, all of which cost more to fix than the original sinking.
For the small jobs that are appropriate to handle yourself, a short checklist helps:
- Confirm the offset is minor, generally under a half-inch, with no rocking or hollow sound when you step on it.
- Clear the area of debris, dirt, and loose material before grinding or patching.
- Wear eye protection and a dust mask when grinding, since concrete dust is a respiratory irritant.
- Use a repair mortar rated for exterior, load-bearing use, not an interior patching compound.
- Let any patch cure fully, typically 24 to 72 hours depending on the product, before allowing foot traffic.
If you find yourself reaching for a jack, a pump, or considering removing and repouring a section yourself, that is the signal to call a contractor instead.
Costs, timelines, and permitting: what to expect
Repair costs vary by method, panel size, access, and site conditions, but a few patterns hold across most jobs.
Foam injection and mudjacking are priced by the square foot and are almost always cheaper than replacement for a single sunken panel, since they reuse the existing slab. Full replacement costs more because it includes demolition, disposal, new material, and labor for forming and finishing. Several factors push any of these prices higher: tight access that requires hand tools instead of machinery, landscaping or irrigation lines that need protection or rerouting, tree roots that require careful excavation, and a subbase that turns out to be contaminated once the old concrete comes out.
Timelines follow a similar pattern:
- Foam injection typically takes a few hours per panel, with the sidewalk usable again the same day since the foam cures quickly.
- Mudjacking takes a similar amount of time on site but may need a short waiting period before heavy foot traffic resumes while the slurry sets.
- Full replacement takes longer overall: demolition and subbase prep in one visit, then a curing period of several days before the new concrete can handle regular foot traffic, following the curing and joint-sealing steps outlined in full-depth repair procedures.
Before paying for any of this out of pocket, check whether your city runs a shared-cost sidewalk program. Programs like Chicago's Shared Cost Sidewalk Program split repair costs between the homeowner and the municipality and outline the inspection and permit process upfront. Other cities run their own scheduled inspection programs; Toledo's public works department, for example, marks panels for repair or replacement based on condition and runs repairs on a seasonal schedule. Sidewalks in the public right-of-way are frequently a shared or fully municipal responsibility, so it is worth a call to your local public works office before assuming the bill is entirely yours.
How to choose and vet a sidewalk repair contractor
The lifting methods described above depend heavily on the skill of whoever is running the equipment, which makes vetting a contractor as important as picking the right method.
- Ask for a license and proof of insurance and confirm both are current for work in your area, not just a general business license.
- Ask specifically about experience with the method you need, since a contractor who mostly pours new driveways may not have deep foam injection or mudjacking experience.
- Request references or before-and-after photos from jobs similar to yours, particularly ones involving root intrusion or drainage issues if that applies to your sidewalk.
- Get the scope of work in writing, including the repair method, materials to be used, how cleanup and landscaping restoration will be handled, and any warranty terms.
- Get at least two or three quotes before committing, since prices and recommended methods can vary meaningfully between contractors.
A few red flags are worth walking away from: a contractor who refuses to put an estimate in writing, one who asks for full payment in cash before starting, or one who promises a same-day full replacement including cured, traffic-ready concrete. Concrete needs time to cure regardless of who pours it, and any timeline that skips that step is cutting a corner somewhere.
Preventing the next sunken sidewalk
Most of the causes covered earlier point to the same fix: manage water, and the concrete usually takes care of itself.
- Correct the grading around the sidewalk so water drains away from the slab rather than pooling against it, especially after regrading following any excavation nearby.
- Reseal joints on a regular schedule, since open joints let water straight down into the base material where it can erode support.
- Inspect after heavy rain or hard freezes, when soil movement is most likely to show up as a new gap or offset.
- Manage nearby tree roots with a root barrier installed at least 18 inches deep, or a root-excluding base of two glued 2-inch foam boards or 4 inches of washed gravel, which extension research shows meaningfully reduces future lifting when installed at the time of repair.
- Use a properly compacted gravel base on any new pour, generally 4 to 6 inches deep, since under-compaction is one of the most common causes of early settlement.
Pro Tip: If a tree is close enough to threaten the sidewalk, talk to an arborist before removing roots. Cutting the wrong roots can destabilize the tree just as easily as leaving them can crack the concrete.
Preservation-focused approaches like joint sealing and partial-depth repairs, rather than full replacement, are generally the better long-term value when a sidewalk is caught early enough to qualify for them, a point preservation guidance from the concrete industry backs consistently. Homeowners planning a new pour can find more detail on proper gravel base depth and compaction and on joint sealing practices that reduce the odds of a repeat problem.
Field notes from a working concrete crew
On a typical sunken sidewalk assessment, a crew documents a specific set of details before recommending anything: the panel's exact dimensions, close-up and wide photos of the offset, subgrade observations from a probe or a look at the exposed edge, and any drainage patterns visible near the slab. Those details, not a general impression of "the sidewalk looks bad," are what actually determine whether a lift will hold or whether the panel needs to come out.
A few patterns show up often enough to be predictable:
- A single panel dropped near a downspout or low grading point usually points to washout, and foam injection typically resolves it cleanly.
- A panel tilted along one edge with no cracking often means uneven original compaction, which mudjacking or foam injection can correct.
- A cracked panel near a mature tree usually means the root is still active, and lifting without addressing the root leads to a repeat problem within a couple of seasons.
- Multiple adjoining panels sinking in a line often traces back to a utility trench that was never compacted properly on the way back in.
Homeowners can speed up an assessment considerably by clearing a path to the sidewalk before the crew arrives, shutting off nearby sprinklers so the crew is not working around active irrigation, and flagging any recently planted landscaping that needs protecting from foot traffic or equipment. A quick look at how concrete contractors assess and repair uneven slabs shows the same pattern holds across most residential concrete work, not just sidewalks: the diagnosis takes ten minutes, and it decides everything that follows.
What I would do if this were my sidewalk
If I had a sunken panel in front of my own house, I would start with the cause, not the fix. A washout under an intact slab gets a foam lift. A cracked panel over root damage or a contaminated base gets replaced, no matter how tempting the cheaper lift quote looks, because a lift on a bad foundation just delays the same repair by a year or two.
Measure the offset, take your photos, and call your city's public works line before you call a contractor. That one phone call, checking for a shared-cost sidewalk program, can change your out-of-pocket cost more than any negotiation with a contractor will. Then get two or three quotes, ask each contractor which method they recommend and why, and pick the answer that matches the cause you documented rather than the one that sounds cheapest on the phone.
— Jake
How A to Z Construction can help with sidewalk and slab repair
A sunken sidewalk rarely stays an isolated problem. It usually points to a grading, drainage, or base issue that affects the driveway, patio, or foundation nearby, and that is where having one crew handle the whole picture saves you time. A to Z Construction handles concrete flatwork, slab replacement, excavation and grading, and full site restoration in-house, so the same team that diagnoses your drainage problem is the one pouring the new concrete and regrading the yard around it.

Working with one crew instead of separate excavation, concrete, and landscaping subcontractors can mean fewer scheduling gaps and one point of contact if something needs adjusting mid-project. If your sidewalk, driveway, or slab needs a real diagnosis rather than a quick patch, request a concrete estimate and get a plan built around what is actually happening under your concrete, not just what is visible on top.
Sources
For homeowners who want to go deeper on the technical side, the FHWA's guidance on full-depth repair procedures covers the construction sequence contractors follow for full replacement. Extension research on sidewalk repair near trees is the best reference for root barrier depth and root-excluding base materials. For surface preparation reference material, sandblasting and concrete surface prep techniques cover related exterior concrete work. For cost-sharing and permit rules, check your own city's public works or sidewalk program page, following the pattern set by programs like Chicago's Shared Cost Sidewalk Program.
- 5.0 Construction Procedure - Full-Depth Repairs - Federal Highway Administration
- Guide for Maintaining Pedestrian Facilities for Enhanced Safety - LTAP / FHWA
- Sidewalk Repair Near Trees - Iowa State Extension / Bartlett Lab Staff
FAQ
How much does it cost to fix a sunken sidewalk?
Cost depends heavily on the method and panel size: foam injection and mudjacking are generally cheaper per square foot than full replacement because they reuse the existing slab. Access, landscaping, tree roots, and subbase condition all push the price up regardless of method, so get a written quote based on your specific panel rather than a general estimate.
Will homeowners insurance cover sidewalk repair?
Standard homeowners insurance policies typically do not cover sidewalk repair caused by normal soil settlement or wear, since that falls under maintenance rather than sudden accidental damage. Coverage depends entirely on your specific policy terms, so check with your insurer directly before assuming either way.
My concrete slab is sinking. What can I do to fix it?
Start by measuring the height difference and photographing the affected area, then match the fix to the cause. Soil-stabilizing lift methods like foam injection often work well when the slab itself is intact, while a cracked or multi-piece slab generally needs full-depth replacement instead.
What causes a sidewalk to sink?
Sidewalks sink most often from soil settlement, erosion or washout under the slab, poor original compaction, drainage problems, freeze-thaw cycling, or tree root activity. The cause usually determines which repair method will actually hold, which is why a quick diagnosis matters more than jumping straight to a fix.
Should I try mudjacking or foam injection first?
Foam injection tends to install faster with less landscaping disruption and works well in tight-access areas, while mudjacking often costs less per square foot on straightforward jobs with stable soil. Neither works on a slab that is already cracked into pieces or sitting on a contaminated base, since those situations call for full replacement.