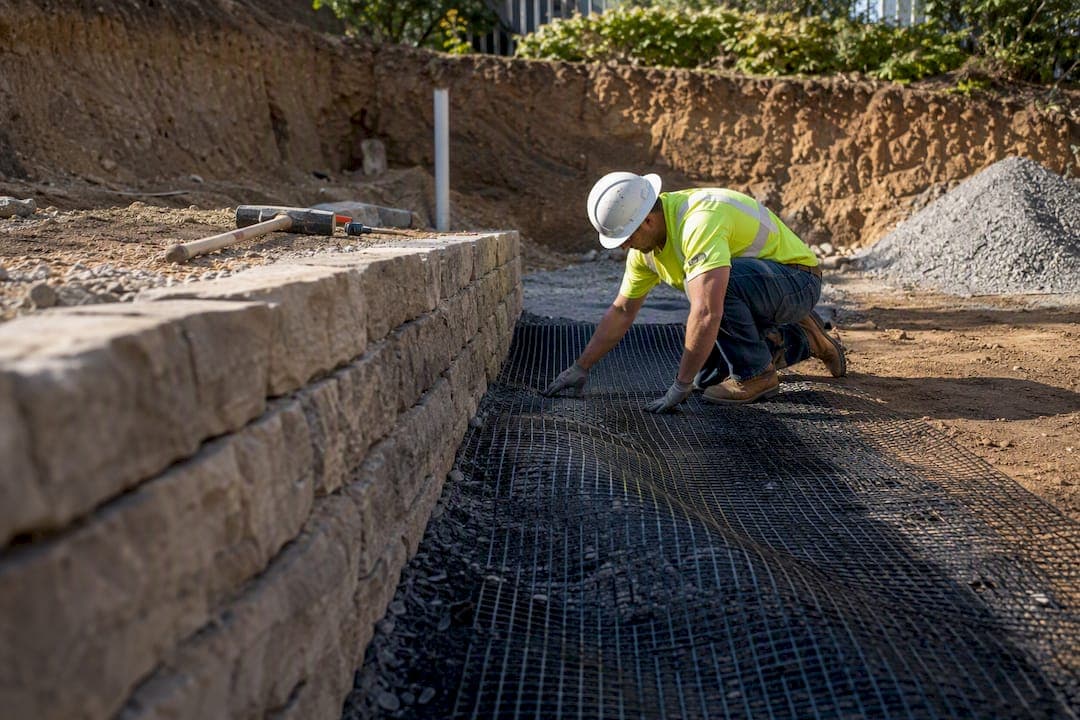
Geogrid becomes necessary once your wall crosses about 3 to 4 feet in height, sits in poor or wet soils, carries a surcharge like a driveway or patio above it, or climbs a steep slope. Below that, gravity and block weight alone usually hold the line. Above it, the soil pushing against the wall generates active pressure that a plain stack of block can't resist, and geogrid ties that soil mass together so it acts as one reinforced block instead of loose dirt against a thin wall.
Site conditions that typically call for geogrid:
- Wall height over 3 to 4 feet, even with a quality block system
- Clay-heavy, silty, or poorly draining native soils
- A driveway, patio, structure, or parking area within a few feet of the wall's top
- Slopes above or below the wall steeper than roughly 2:1
- Local building codes or your jurisdiction requiring engineered plans past a set height
If your project checks two or more of these boxes, talk to a licensed engineer before you order block.
Key Takeaways
A geogrid retaining wall works because reinforced backfill resists lateral soil pressure that an unreinforced gravity wall cannot handle above roughly 3 to 4 feet.
| Point | Details |
|---|---|
| Know your triggers | Height over 3 to 4 feet, poor soils, surcharge loads, or steep slopes all point to needing geogrid reinforcement. |
| Match design to conditions | Embedment length near 60% of wall height and spacing of 8 to 24 inches are starting points, not fixed rules. |
| Compaction is non-negotiable | Insist on lifts no deeper than 8 inches and documented density testing near 95% standard Proctor. |
| Slack kills performance | Pull grid taut and stake it before backfilling; loose grid is the most common cause of post-build movement. |
| Get professional design help | A-to-zconstruction's in-house crews handle grading, masonry, and drainage together for geogrid-reinforced walls built to hold. |
Table of Contents
- What Is Geogrid and What Types Go Into Retaining Walls?
- How Do You Know If Your Wall Needs Geogrid?
- What Design Numbers Do Engineers Actually Use?
- How Do You Install Geogrid on a Segmental Wall?
- Where Do Geogrid Walls Go Wrong?
- What Performance Benefits Does Geogrid Actually Deliver?
- What Should You Ask Your Contractor Before They Break Ground?
- How Should You Maintain and Inspect a Geogrid Wall Over Time?
- What Does Environmental Impact Look Like for Geogrid Walls?
- What Does a Geogrid Retaining Wall Typically Cost to Build?
- The Gap Between Manufacturer Charts and Real Jobsites
- Build Your Geogrid Retaining Wall With A-to-zconstruction
- Sources
- FAQ
What Is Geogrid and What Types Go Into Retaining Walls?
A geogrid retaining wall relies on a geosynthetic grid buried in the backfill that locks into compacted soil through its open apertures, converting loose fill into a reinforced soil mass that resists the pressure trying to push the wall face outward. The grid doesn't hold the wall up by itself. It works with compacted backfill, gripping soil particles the way rebar grips concrete.
Two main types show up on residential and commercial jobs. Uniaxial geogrid is engineered for strength in one direction, which is exactly what a retaining wall needs since the load runs perpendicular to the wall face. Biaxial geogrid distributes strength in both directions and is better suited to soil stabilization under roads and slabs, not wall reinforcement. Material matters too:
- HDPE geogrid: stiff, rugged, and common in taller commercial walls
- High-tenacity polyester yarn geogrid: coated for durability, flexible, and widely used in residential segmental walls
- Both resist UV degradation and creep so the reinforcement doesn't stretch or weaken over decades under sustained load
Manufacturers rate their products by long-term design strength (LTDS), not just raw tensile strength, since soil load is a sustained force, not a one-time pull. Rolls typically come in standard widths matched to block coursing, with length cut to the embedment your engineer specifies.
How Do You Know If Your Wall Needs Geogrid?
Run through these triggers in order. Any single "yes" is a reason to take reinforcement seriously.
- Height. Most residential guidance puts the threshold around 3 to 4 feet for segmental block walls. A short garden wall under that height rarely needs it, but stacking two short walls into a tiered system without adequate setback often does.
- Soil quality. Weak, high-fines, or organic soils compress and shift more than clean granular soil, and they generate different pressure profiles that unreinforced gravity walls aren't built to handle.
- Surcharge loads. A driveway, a shed, foot traffic, or a swimming pool near the top of a wall adds weight the design must account for, even on a wall short enough to otherwise skip reinforcement.
- Slope and geometry. Walls built into a hillside, tiered systems, or walls with a tight footprint against a property line often need geogrid to manage pressure in a constrained space.
- Code and permitting. Many jurisdictions require an engineer's stamp past a set height, and inspectors increasingly ask for it whenever a surcharge is present regardless of wall height. Estimating what engineering and permitting will cost before you commit to a design is worth doing early using a resource like this retaining wall permit cost calculator.
What Design Numbers Do Engineers Actually Use?
Engineers don't guess at geogrid placement. Every dimension traces back to wall height, soil type, and surcharge load, and small site differences can shift the numbers considerably.
Embedment length typically starts around 60% of the total wall height as a rule of thumb, meaning a 6-foot wall might need grid extending 3.6 feet back into the backfill under standard conditions.
Vertical spacing between geogrid layers usually falls between 8 and 24 inches. Taller walls and heavier surcharges call for tighter spacing (more layers, closer together), while shorter walls with clean backfill can space layers further apart.
Strength selection comes down to matching the grid's long-term design strength to the calculated load with a safety factor built in, which is why uniaxial products dominate wall applications over biaxial ones.
Backfill matters as much as the grid itself. Specifications call for:
- Clean, well-draining granular backfill, never native clay or topsoil, directly behind the wall
- Compaction in lifts no deeper than 8 inches (200 mm) per pass
- Density targets around 95% of standard Proctor per ASTM D698, verified with field compaction testing rather than assumed
Pro Tip: Ask your contractor how often they're running compaction tests, not just whether they compact. "We compact in lifts" means nothing without a test frequency tied to it, especially on walls over 4 feet.
Commercial jobs and taller residential walls should have independent inspection logs documenting each lift's compaction result. That paperwork is what protects you if a wall settles years later and you need to show it was built to spec.
How Do You Install Geogrid on a Segmental Wall?
Getting the sequence right matters more than any single material choice. Here's the order that holds up over time:
- Prep the base. Excavate to the design depth, place and compact a leveling pad of crushed stone, and set the first course of block dead level. Every course above depends on this one being right, which is why footing prep deserves its own attention in any retaining wall footing plan.
- Unroll and orient the grid. Strength direction runs perpendicular to the wall face. Roll it out, place the front edge tight against the back of the block (per the manufacturer's connection detail), and cut to the specified embedment length.
- Pull it taut and anchor it. Remove every wrinkle and fold before backfilling. Stake the back edge to hold tension while you place fill. Where sheets meet at the face, butt them edge to edge rather than overlapping, unless the manufacturer's detail calls for overlap behind the face.
- Backfill in lifts. Spread clean granular fill in layers no deeper than 8 inches, running the compactor in paths parallel to the wall face. Keep heavy equipment away from the immediate wall face to avoid pushing block out of alignment.
- Repeat course by course. Stack the next block layer, place the next geogrid layer at the specified vertical spacing, and continue. Corners and curves need extra layout care since grid orientation can't bend around a radius the way block can.
- Do a field QA pass before closing up. Check for slack, folds, or torn grid, confirm compaction with a test where required, and verify continuity across every layer before final grading.
Pro Tip: Slack is the single most common field error on geogrid jobs. A grid that looks tight before backfilling can still shift and bunch under the weight of fill if it wasn't staked. Walk the layer one more time after staking, before the first bucket of fill goes down.
Where Do Geogrid Walls Go Wrong?
Most geogrid failures trace back to a handful of repeatable mistakes rather than bad luck or bad materials.
- Cost surprises. Reinforced walls need wider excavation, more backfill material, and more labor hours, which raises the bid compared to a short unreinforced wall.
- Slack left in the grid. Loose or folded geogrid can't develop full interlock with the soil, and the wall may still bulge or lean even though grid is technically present.
- Wrong orientation or insufficient embedment. Running a uniaxial grid the wrong direction or cutting it short of the design length undermines the entire reinforced mass concept.
- Poor backfill or drainage. Using native clay instead of clean granular fill, or skipping drainage aggregate, traps water pressure behind the wall that geogrid alone can't offset.
- Skipping it where it's needed. Walls that should have been reinforced but weren't tend to show leaning, bulging, or outright collapse within a few years, not decades.
What Performance Benefits Does Geogrid Actually Deliver?
A properly designed geogrid retaining wall resists lateral soil pressure far better than an unreinforced gravity wall of the same height, because the reinforced soil mass behaves as a single unit rather than a pile of loose fill pushing against a thin face.
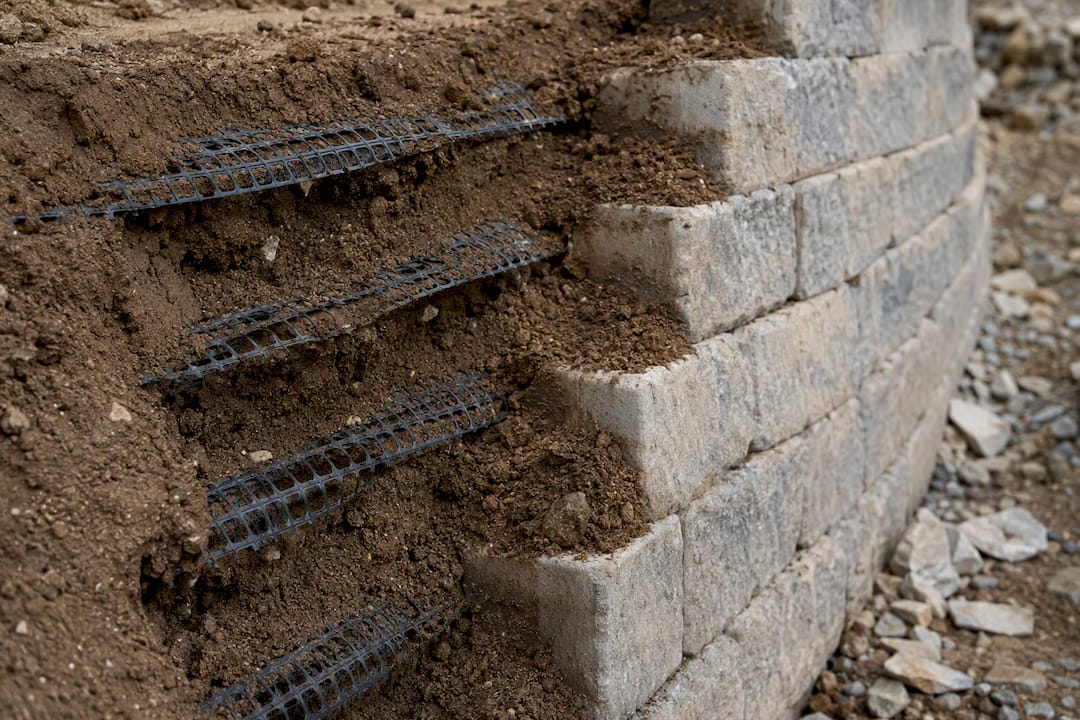
That translates into real savings. Geogrid reinforcement can reduce the amount of aggregate needed on a given project while allowing steeper slopes and a smaller footprint, which matters on tight lots where excavation space is limited. Properly installed and drained, reinforced walls also tend to need less long-term maintenance than walls that were undersized for their conditions from the start.
The application extends well past decorative garden walls. The same reinforcement principle shows up under roads, embankments, and construction platforms wherever engineers need soil to carry more load than it would on its own.
What Should You Ask Your Contractor Before They Break Ground?
A to Z Construction's crews treat geogrid installation as a sequence with zero shortcuts: pull every layer tight, stake it before backfilling, compact in controlled lifts, and keep equipment off the grid until enough cover soil protects it from tearing.
Before you sign a contract, ask for:
- A soil report or at least a soil assessment for your site
- P.E.-stamped drawings for any wall approaching or exceeding your local height threshold
- A written compaction protocol with stated test frequency, not just a verbal assurance
If a previous wall was built without adequate reinforcement and is now leaning or cracking, remediation typically means partial or full deconstruction, correcting the base and drainage, and rebuilding with properly specified grid. It's rarely a patch job. For an estimate on new construction or a wall that needs to be rebuilt right, A to Z Construction's masonry and block wall crews handle the work in-house from grading through final course.
How Should You Maintain and Inspect a Geogrid Wall Over Time?
Geogrid buried behind a properly built wall doesn't need hands-on maintenance the way a wood fence or a deck does. Once it's compacted into place, it's protected from UV exposure and mechanical damage, which is exactly why manufacturers rate it for decades of service life. The inspection burden falls on the visible parts of the system instead.
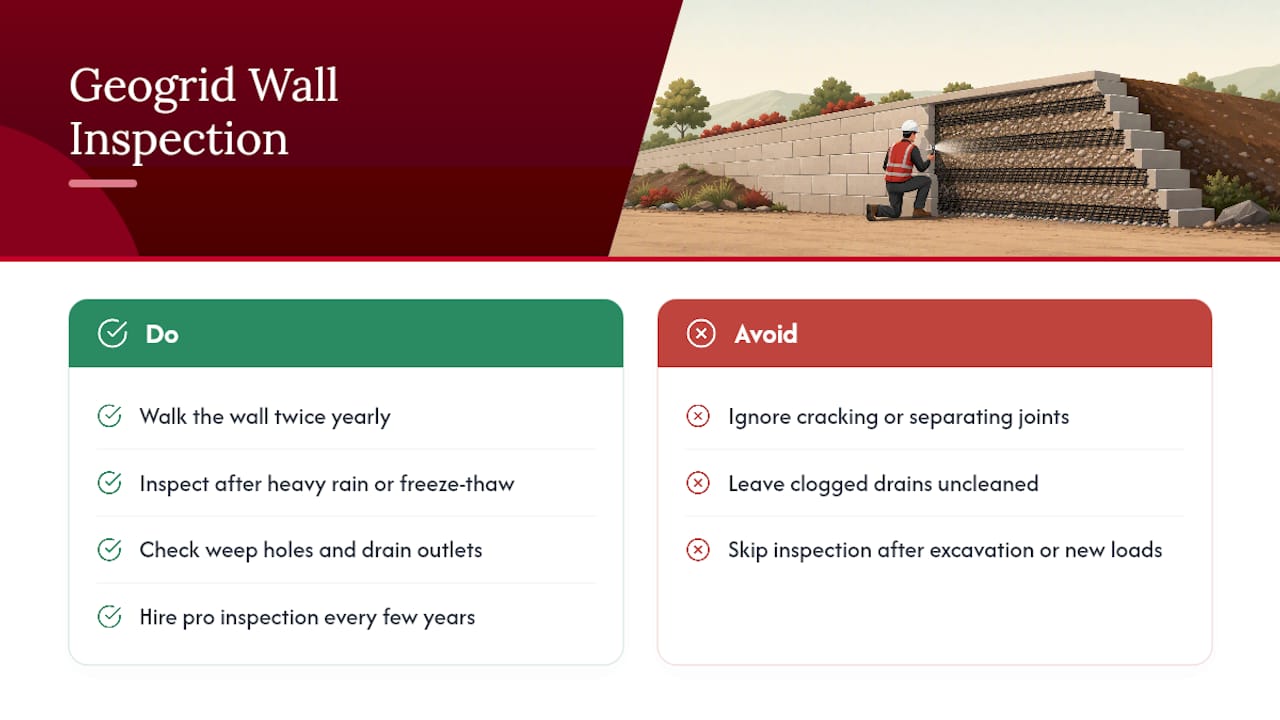
Walk the wall face twice a year, ideally after heavy rain or freeze-thaw cycles, and look for a few specific warning signs. Bulging or leaning sections suggest the reinforced mass behind the face is shifting, which can point to a drainage failure or an underbuilt design rather than a grid problem itself. Cracking or separating joints between blocks often show up before a wall visibly leans, so catching that early buys time to investigate before the problem gets structural.
Check the drainage outlets at the base of the wall. If weep holes or drain pipe outlets are clogged with soil, mulch, or debris, water pressure builds up behind the wall and pushes against both the block and the geogrid layers in ways the original design didn't anticipate. Standing water at the base after rain, rather than water draining freely, is the clearest sign something's blocked. Good retaining wall drainage is what keeps a correctly built geogrid wall performing the way it was designed to for its full service life.
For taller or commercial walls, a periodic professional inspection every few years is worth the cost, especially if the property has seen unusual rainfall, nearby excavation, or new surcharge loads like a new patio or parking area added after the wall was built.
What Does Environmental Impact Look Like for Geogrid Walls?
Geogrid's sustainability case is mostly about what it lets you avoid rather than what it adds. Reinforced designs typically require less aggregate and a smaller excavation footprint than an unreinforced wall built to the same height and load conditions, since the grid does structural work that would otherwise require sheer mass of stone or concrete.
Less excavation and less imported aggregate mean fewer truck trips hauling material to and from the site, which cuts transport-related emissions and shortens the construction timeline. A smaller footprint also disturbs less existing soil and vegetation around the wall, which matters on residential lots where mature landscaping sits close to the build zone.
The materials themselves, HDPE and coated polyester, are petroleum-derived and don't biodegrade, but that's part of their functional value here. A grid designed to last the service life of the wall, often 50 years or more, doesn't need replacement or added material partway through, unlike some erosion-control alternatives that degrade and require reapplication. Choosing a wall system that avoids over-excavation and oversized footings in the first place is one of the more overlooked ways a hardscape project can reduce its material footprint without sacrificing structural performance.
What Does a Geogrid Retaining Wall Typically Cost to Build?
Reinforced walls cost more upfront than a short gravity wall, and the reasons are straightforward once you see where the money goes. Geogrid material itself adds a line item, but it's rarely the biggest driver. The larger cost increases come from wider excavation to accommodate embedment length, more backfill volume since clean granular fill has to replace native soil across a bigger area, and additional labor hours for placing and compacting each grid layer correctly.
Engineering fees are a factor too. Once a wall crosses the height or surcharge thresholds that require a P.E. stamp, that design work adds cost before construction even starts, though it's a cost that protects you against far more expensive failures later. Permitting fees vary by jurisdiction and often scale with wall height and complexity.
Budgeting realistically means accounting for the full scope, not just block and grid. A detailed breakdown of what drives retaining wall cost up or down, from soil conditions to drainage requirements, is worth reviewing before you compare bids, since a lower quote sometimes means a contractor skipped scope your site actually needs rather than found a genuine efficiency. A wall that needs geogrid and doesn't get it isn't cheaper. It's a deferred cost that shows up later as a rebuild.
The Gap Between Manufacturer Charts and Real Jobsites
Manufacturer installation charts are a solid starting point, but they describe ideal conditions: clean backfill, dry weather, a crew that has done this a hundred times. Real jobsites rarely match that description exactly, and the difference between a wall that lasts decades and one that leans within five years usually comes down to how a crew handles the gap between the chart and the ground in front of them.
The most underrated variable isn't the grid's tensile rating. It's compaction discipline. A crew that skips a test or rushes a lift because rain is coming in will build a wall that looks identical to a properly compacted one on installation day and behaves very differently five winters later. Conventional advice spends a lot of time on choosing the right grid and not nearly enough on verifying the compaction actually happened at the rate the spec calls for.
If there's one thing worth prioritizing above material selection, it's this: get compaction testing in writing, with a stated frequency, before the first lift goes down. A homeowner who can't read a soil report can still ask for that document and hold a contractor to it. That single habit prevents more failures than any grid brand comparison ever will.
— Jake
Build Your Geogrid Retaining Wall With A-to-zconstruction
A-to-zconstruction handles geogrid-reinforced retaining walls the way this guide describes them being built correctly: proper excavation and footing prep, engineer-aware design for walls that need it, and compaction verified in the field rather than assumed. Because grading, masonry, and drainage all run through one in-house crew, there's no coordination gap between the excavator, the block layer, and the drainage install, which is often exactly where geogrid installation errors creep in on projects split across subcontractors.

That matters most on the walls this article flags as needing reinforcement: taller walls, sloped lots, and walls carrying a driveway or patio surcharge. If your project checks any of those boxes, get a free hardscape estimate and have your site conditions reviewed before you finalize a design.
Sources
Keep the technical documents tied to your specific product on file, not just general guidance. Save:
- 10 Series Geogrid - SRW Products
- Geogrid installation | Allan Block
- What is geogrid? How does it work? | Tensar
FAQ
Is Geogrid Necessary for Every Retaining Wall?
No. Short walls under roughly 3 to 4 feet, built on stable soil with no surcharge, often perform fine without reinforcement. Once height, poor soils, or added loads enter the picture, geogrid becomes a standard part of the design.
What Are the Downsides of Using Geogrid?
The main downsides are added upfront cost and deeper excavation, since embedment length requires more room behind the wall than an unreinforced design. Installation errors like leaving slack or using the wrong backfill can also undercut the grid's performance if the crew isn't experienced.
How Do You Attach Geogrid to a Retaining Wall?
Geogrid connects mechanically at the block, not with adhesive or fasteners; it's laid between courses per the manufacturer's connection detail, pulled taut, and held in place by the weight of backfill and staking at the back edge. Installation manuals specify the exact connection detail for each block system.
Does a 4-Foot Retaining Wall Need Geogrid?
A 4-foot wall sits right at the common threshold, so it depends on soil conditions and whether a surcharge load is present. Many designs at that height do call for at least one layer of reinforcement, which is why checking with an engineer or an experienced contractor like A-to-zconstruction before building is worth the conversation.