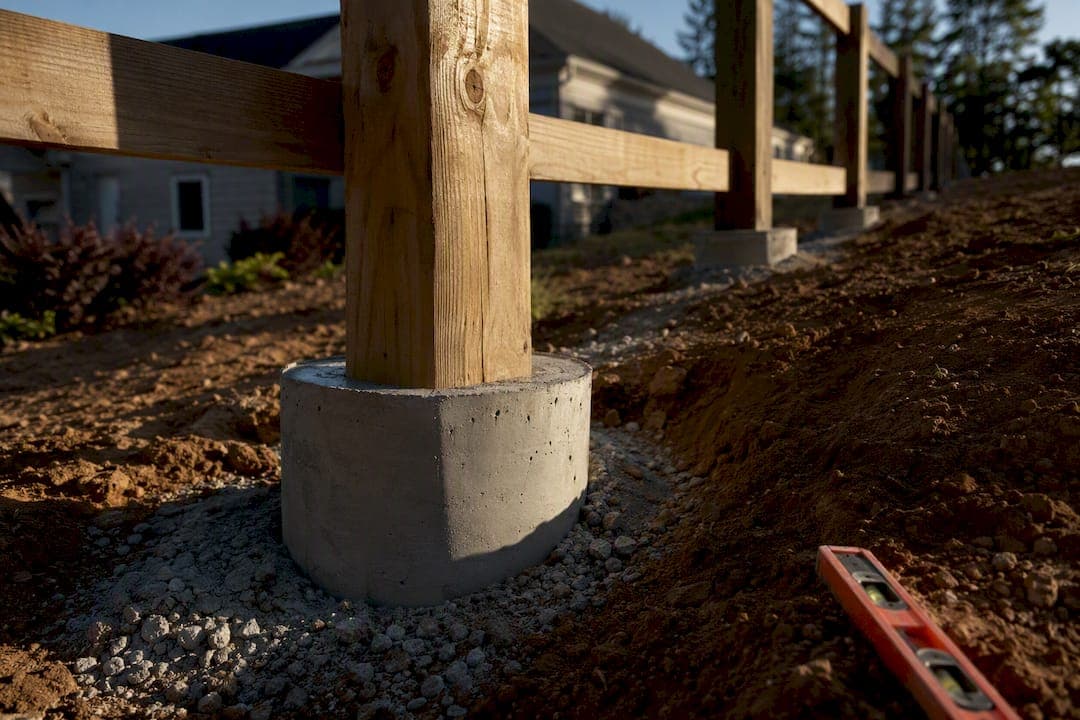
Yes, you can put a fence on a slope, and the method depends on how steep your yard actually is. Use racked fencing, where the rails follow the ground's contour, on gentle and even grades up to roughly 12 to 15 degrees. Switch to stepped fencing, where each panel sits level and steps down the hill, on steeper or uneven terrain. Posts need to be plumb and set deeper on the downhill side, and you'll want a drainage plan before you dig a single hole. Both installation workflows follow below.
TL;DR:
- Racked fencing is suitable for gentle slopes up to about 12 to 15 percent grade, but material flexibility limits its use on steeper terrain.
- Proper measurement of total drop, grade percentage, and drop per panel is essential to decide between racking or stepping for each fence segment.
- Wood fences are easiest to adapt to slopes, while vinyl and aluminum rely on factory limits and adjustable hardware for effective installation.
- Addressing drainage issues and ensuring sufficient footing depth are more critical than method choice for fence longevity and stability.
- Combining racked and stepped techniques on a single fence line is common and effective if transitions are planned at post boundaries with consistent materials.
Table of Contents
- Racked vs Stepped Fencing: Which One Fits Your Yard?
- How Do You Measure a Slope Before Installing a Fence?
- What Materials and Hardware Work Best on Sloped Ground?
- How Deep Should Fence Posts Be on a Slope?
- Step-by-Step: Installing Racked vs Stepped Fencing on a Slope
- Drainage and Erosion: Don't Let Your Fence Become a Dam
- Common Slope-Fence Problems and How to Fix Them
- What a Licensed Contractor Watches for on Slope Installs
- Handling a Fence Line That Changes Steepness Partway Through
- Mixing Racked and Stepped Methods on the Same Fence Line
- Soil Type and Moisture: The Environmental Factors That Decide Footing Success
- What Actually Matters When You Fence a Slope
- How A to Z Construction Handles Sloped Fence and Retaining Projects
- Sources
- FAQ
Racked vs Stepped Fencing: Which One Fits Your Yard?
Racked fencing tilts the whole panel, rail included, so it follows the ground at a constant angle. Stepped fencing keeps every panel level and drops the next section down in a uniform increment, like stair treads. The choice comes down to how consistent your grade is and how much gap you can live with at the bottom of each panel.
Racking gives you a cleaner sightline with no staircase effect, and it controls gaps better on smooth, uniform slopes. The tradeoff is that it pushes real tolerance demands onto your materials. Rigid panels, especially vinyl and some prefab wood sections, only tilt so far before pickets bind or the panel cracks at the joint, so check the manufacturer's rack limits before you commit to this method.
Stepped fencing handles irregular or steep grades that racking can't, and it works with rigid materials that won't flex. The visible cost is the staircase look and a triangular gap under each step that needs a gravel bed or kickboard if you're keeping pets in or critters out.
- Racked: best for gentle, uniform slopes; cleaner look; limited by material flex tolerance.
- Stepped: best for steep or irregular ground; works with rigid panels; leaves gaps to manage at each drop.
- Rule of thumb: grades up to about 12 to 15 percent (roughly 7 to 9 degrees) often allow racking; beyond that, plan to step.
How Do You Measure a Slope Before Installing a Fence?
Before you buy a single post, you need three numbers: total drop, percent grade, and drop per panel. Grab stakes, a mason's line, a line level, a tape measure, and either a builder's transit or a smartphone level app.
- Drive a stake at the top of the run and one at the bottom, marking your actual fence line corners.
- Run a mason's line between them and hang a line level at the midpoint until it reads level.
- Measure the vertical distance from that level line down to the ground at the low stake. That's your total drop.
- Divide total drop by the horizontal run length, then multiply by 100 to get percent grade.
- Divide total drop by the number of panels planned to get drop per panel, which tells you whether it fits within a rackable range or needs stepping.
A quick example: a 50-foot run with a 6-foot total drop is a 12 percent grade. Split across ten 5-foot panels, that's about 7.2 inches of drop per section, which most standard 6-foot fence systems can rack without strain. Push that same drop across a shorter run and the math tips you toward stepping instead, as the Home Depot fence-on-a-hill guide lays out.
What Materials and Hardware Work Best on Sloped Ground?
Wood adapts to slopes better than almost anything else because you can trim boards and pickets on site to close gaps as you go. Vinyl fencing racks well within factory-set limits but resists field modification, so you're relying on adjustable brackets rather than a saw. Aluminum and other metal panel systems usually offer rackable hinges built into the panel itself, which makes them a strong pick for moderate slopes without stepping. Chain-link is the most forgiving option of all: it follows grade continuously and has ASTM standard practice F567 guidance built around sloped installation.
- Adjustable rackable brackets: let rails pivot at the post connection instead of forcing the whole panel to flex.
- Galvanized or stainless fasteners: resist the extra moisture that collects at low points on a slope.
- Concrete anchors or sonotubes: give downhill posts the extra footing depth uneven grade demands.
- A post level and stakes: the two cheapest tools that prevent the most common slope mistakes.
- A power auger: worth renting when you're digging more than six or eight holes on rocky or clay-heavy ground.
If you want the durability of vinyl without guessing at rack tolerance, a vinyl fence installation sized correctly for your grade avoids the trial-and-error that turns a weekend project into two.
How Deep Should Fence Posts Be on a Slope?
The standard rule puts one-third of the post below grade, but on a slope that rule only works if you measure from the shallowest side of the hole, not the average ground level. Dig to a uniform depth measured from the surface and you'll undercut every downhill post, setting up a lean within a season or two.
For a typical 6-foot residential fence, plan on 2.5 to 3 feet of footing depth as a baseline, and add extra concrete on the downhill face of each hole so the post has as much bearing there as it does uphill. On steep runs, tighten spacing from the usual 8 feet down to 6 feet between posts. Shorter spans mean less leverage on each post and less rail sag between them.
- Measure post depth from the low side of the hole, never the high side.
- Add 15 to 20 percent more concrete on downhill footings versus flat-ground installs.
- Use sonotubes in loose or sandy soil to keep the pour from spreading before it cures.
- Check plumb on two faces, front-to-back and side-to-side, not just one.
- Brace every post with two temporary stakes until concrete sets, minimum 24 to 48 hours.
Pro Tip: Check plumb again the morning after you set posts, before you attach a single rail. Concrete shrinks slightly as it cures, and a post that reads perfectly plumb at 5 p.m. can drift a degree by the next morning on soft soil.
Step-by-Step: Installing Racked vs Stepped Fencing on a Slope
The two methods share a setup phase and diverge once posts go in the ground.
Racked installation:
- Lay out the line with stakes and mason's line, marking each post location on the slope itself.
- Set every post plumb, ignoring the angle of the ground entirely.
- Attach rackable rails or hardware that lets the rail pivot to follow the slope.
- Install panels or pickets, letting the whole assembly tilt uniformly between posts.
- Sight down the top rail to confirm a continuous, even line with no jumps.
Stepped installation:
- Calculate the step drop per section from your earlier measurements.
- Set posts so each section's top elevation is level within itself, uniform across that segment.
- Install a level panel in each section, letting the next section start lower by the calculated step.
- Close the triangular gap under each step with gravel, a kickboard, or low plantings.
- Confirm every individual section reads level with a four-foot bubble level before moving to the next.
Most fence contractors treat 12 to 15 percent grade as the practical ceiling for racking before stepping becomes the more reliable choice, a threshold that shows up across multiple installation guides for good reason: past that point, rail hardware and panel materials start fighting the angle instead of following it.
Gates need their own plan on either method. Set gate posts level with each other regardless of slope, and leave at least 2 inches of ground clearance on the low side so the gate swings freely without dragging as the ground shifts seasonally.
Drainage and Erosion: Don't Let Your Fence Become a Dam
A solid-panel fence set across a slope can block runoff exactly the way a small dam does, pooling water against the uphill side and accelerating erosion at every post. That standing water is what eventually rots wood posts or heaves concrete footings loose.
Contractors typically fix drainage before the fence goes in, not after, since digging up a finished fence line to add a trench is far more work than trenching first. A gravel-filled trench along the uphill side lets water pass through instead of pooling, and weep holes at the base of solid panels give trapped water somewhere to go, as explained in this construction neuve et fosse septique guide for proper site preparation.
- Add a gravel trench upslope of the fence line before setting posts.
- Cut weep holes in solid vinyl or wood panels near ground level.
- Reroute concentrated runoff, downspouts especially, well away from post footings.
When the grade is steep enough that erosion keeps undercutting footings, a retaining wall built before the fence solves the underlying problem instead of patching around it repeatedly.
Common Slope-Fence Problems and How to Fix Them
Watch for gaps widening after heavy rain, posts leaning toward the downhill side, and gates that start binding as the ground swells or dries seasonally. These are early warning signs, not cosmetic annoyances.
A loose panel or minor gap usually just needs a shim or a kickboard adjustment. A leaning post is a different story: if it's moved more than an inch or two out of plumb, re-anchoring with fresh concrete beats patching around a compromised footing. Walk the fence line each spring and after major storms, checking post plumb, panel attachment, and gate swing before small issues become a full rebuild.
What a Licensed Contractor Watches for on Slope Installs
A to Z Construction's crews lean on contractor-tested post spacing rules that adjust for soil type, wind exposure, and grade together, not grade alone. Sandy or loose soils often call for tighter spacing and deeper footings than the same slope in compact clay.
When erosion or standing water shows up during the site walk, we recommend addressing a retaining wall before the fence goes in, since fencing over an unstable slope just delays the failure. Field shortcuts like batching concrete for multiple holes at once and bracing every post for a full 48 hours cut rework significantly. Complex grades, drainage engineering, or anywhere a permit applies are the clear signals it's time to call a licensed contractor instead of finishing solo.
Handling a Fence Line That Changes Steepness Partway Through
Most yards don't hold one consistent grade for an entire fence run. A slope might ease into flat ground near the house, then drop sharply toward a back property line, and treating the whole run with one method usually produces a fence that looks fine in one section and awkward in another.
The fix is to measure in segments, not as one continuous line. Break the fence line at natural grade transitions, wherever the slope visibly steepens or levels out, and recalculate percent grade for each segment independently using the same stake-and-string method from earlier. A run that's 8 percent grade for the first 30 feet and 20 percent for the next 20 feet is really two different projects joined at one point.
Post spacing should also shift at that transition point. Tighten spacing as the grade steepens, since steeper ground puts more lateral stress on each post and more variation in fill depth between neighboring footings. Plan for a slightly heavier post or extra concrete at the exact spot where steepness changes. That transition post carries an uneven load from both directions and tends to be where leaning starts first if it's undersized.
Visually, the transition point is also where a fence can look choppy if you're not deliberate about it. Ending a racked section and starting a stepped section right at the grade change, rather than trying to blend them gradually, actually reads cleaner to the eye than forcing one method to stretch across ground it wasn't designed for.
Mixing Racked and Stepped Methods on the Same Fence Line
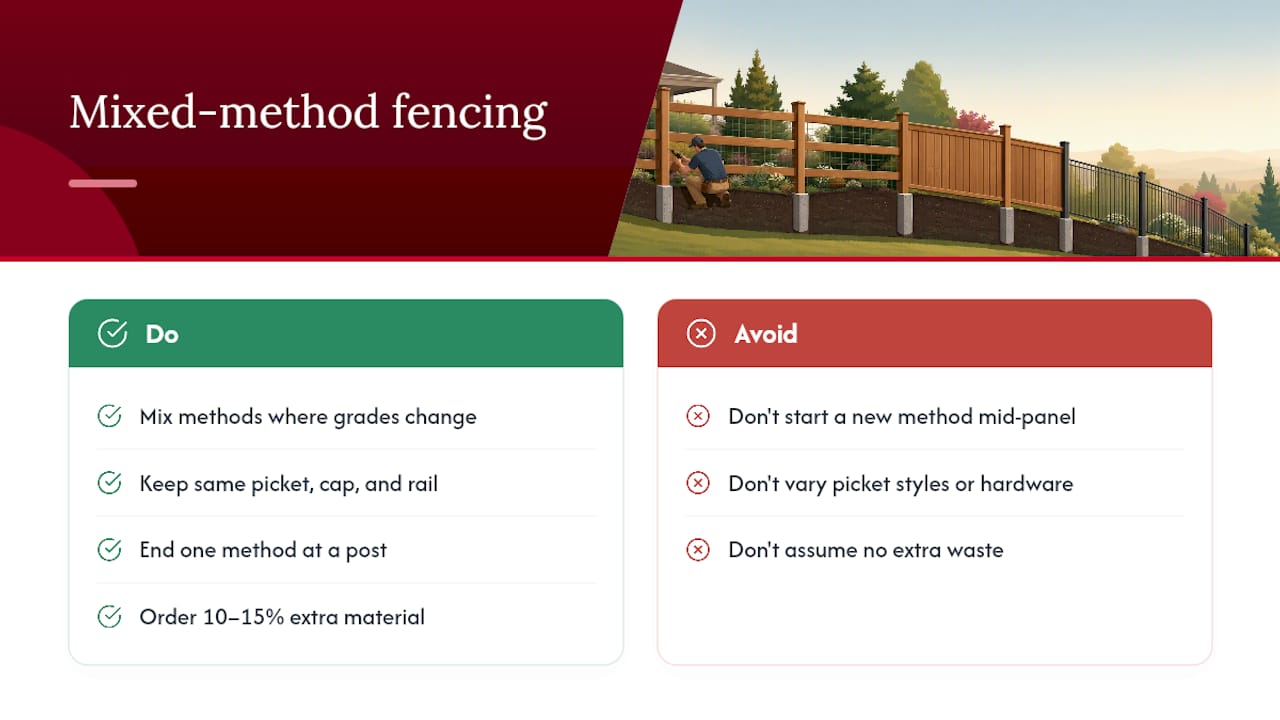
Combining both methods on one property isn't a compromise. It's often the correct answer when your yard has more than one grade personality. A front section that's nearly flat can rack seamlessly, while a back corner that drops sharply toward a drainage swale calls for stepping, and there's no rule that says a single fence line has to use one technique end to end.
The key to making a mixed installation look intentional rather than patched together is consistency in materials and hardware, even when the method changes. Use the same picket style, the same post caps, and the same rail profile across both racked and stepped sections. The eye reads material consistency as a unified design even when the geometry shifts.
Plan the transition at a post, not mid-panel. Starting a new method partway through a panel creates a visible seam that's hard to disguise. Ending one technique cleanly at a post and starting the next method at the following post gives you a natural break point that looks planned instead of improvised.
Budget for slightly more material waste on a mixed installation. Racked sections use full panels tilted to angle, while stepped sections often need custom-cut pickets to manage the drop at each step, and you'll burn through more offcuts switching between the two approaches than you would run one method the whole way. Order 10 to 15 percent extra material on any project where you know you're mixing methods, so a mid-project supply run doesn't stall momentum on a weekend build.
Soil Type and Moisture: The Environmental Factors That Decide Footing Success
Soil composition changes how deep you need to dig and how much concrete you actually need, independent of the slope math. Sandy soil drains fast but offers weak lateral holding power, which means posts in sandy slopes need either extra depth or a wider concrete footing to resist the sideways push that gravity puts on anything set into a hillside. Clay-heavy soil holds posts more firmly when dry but expands and contracts dramatically with moisture swings, and that seasonal movement is exactly what causes posts to heave or lean over a year or two.
Moisture behaves differently on a slope than it does on flat ground, and that's the part most DIY guides skip. Water doesn't sit evenly across a graded yard. It concentrates at low points and along any barrier that interrupts its natural path, which is exactly what a fence line does. That means the downhill posts on any sloped run are dealing with more sustained moisture exposure than the uphill posts on the same fence, even though they're built to the same spec.
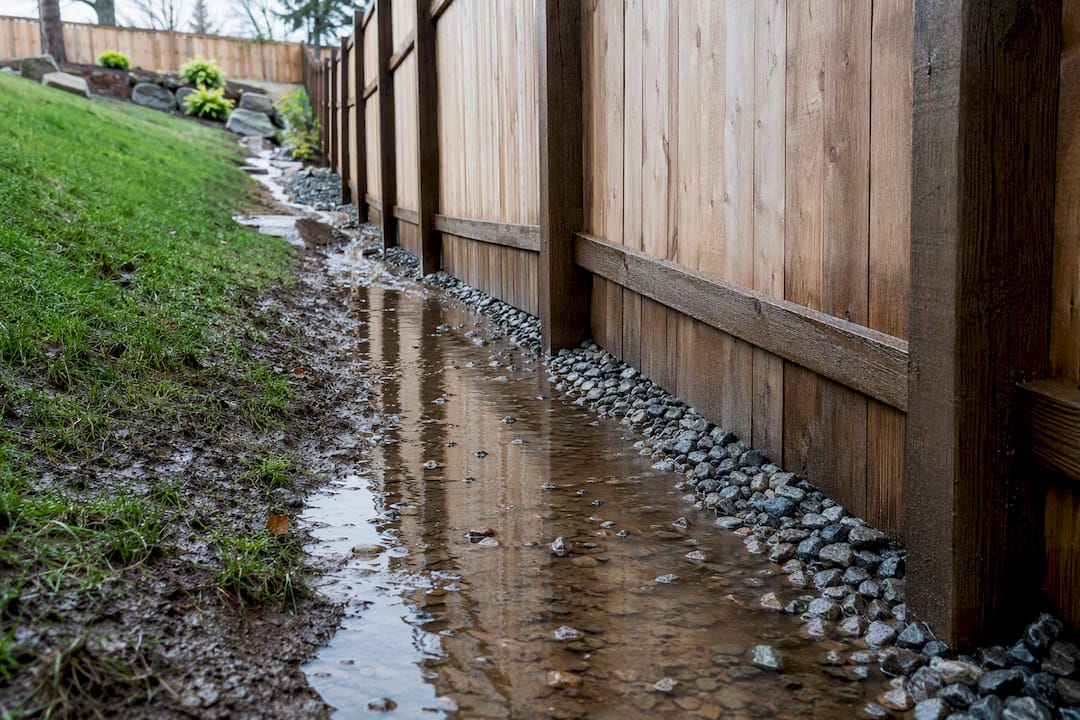
Practically, this means downhill footings deserve a moisture-resistant upgrade even when the rest of the fence uses standard hardware. Galvanized fasteners and pressure-treated post bases matter more at the bottom of a slope than at the top. If the soil test or a simple observation after rain shows water pooling near the low end of your planned fence line, that's the signal to add drainage work before setting a single post there, rather than fighting standing water around a footing for the life of the fence.
Rocky or heavily compacted soil creates a different problem: it resists digging to proper depth, and a shortened footing on tough ground is one of the more common causes of premature post failure on sloped installs.
What Actually Matters When You Fence a Slope
Most slope-fencing advice online treats the racked versus stepped decision as the whole project, and that's where it falls short. The method you choose matters less than getting post depth and drainage right, because a beautifully racked fence with undersized downhill footings fails the same way a poorly stepped one does: slowly, then all at once after a wet spring.
If I had to rank priorities for a DIYer standing at the top of their yard with a tape measure, drainage comes first, footing depth second, and method choice third. That order surprises people, because method feels like the big decision when you're planning the project. In practice, it's the easiest part to get right, since the math is straightforward once you measure correctly. Drainage and depth are where the guesswork lives, and where most slope-fence failures actually start.
The other thing conventional advice underplays: mixing methods across one fence line isn't a workaround, it's often the smarter engineering call. A yard with genuinely variable grade deserves a fence that respects that variability, and forcing one technique across ground that changes character halfway through the run is how you end up rebuilding a section three years early.
Get the ground right first. Everything else on this project is comparatively forgiving.
— Jake
How A to Z Construction Handles Sloped Fence and Retaining Projects
Some contractors offer a single licensed crew to handle the earthwork, drainage, retaining wall, and fence installation together, so the retaining wall footing and the fence footing get planned as one job instead of two mismatched schedules.

That matters most on grades where fencing alone isn't the real fix. If your site visit reveals erosion, poor drainage, or a slope too unstable for posts alone, our hardscape services cover the retaining wall and terracing work that needs to happen first, coordinated with the same team building your fence. A typical project starts with a site visit to measure grade and check soil conditions, followed by a fixed estimate and a phased plan if retaining work comes before the fence goes in. Request a free hardscape estimate to get a site visit scheduled and find out whether your slope needs more than a fence to hold up long term.
Sources
For deeper method comparisons, see the Home Depot fence-on-a-hill guide and contractor-tested post spacing rules.
- How to Build a Fence on a Hill | The Home Depot
- Fence Installation on Slopes: Racked vs Stepped Approaches | Fence Installation Authority
- Best Fence for Sloped Yard: Friendly Guide for Uneven Terrain - Buzz Custom Fence
- How to Build a Fence on a Slope | Racked vs. Stepped Guide
FAQ
Can a Fence Be Installed on a Slope?
Yes. Racked fencing works on gentle, uniform grades up to roughly 12 to 15 percent, and stepped fencing handles steeper or irregular terrain by keeping each panel section level.
How Do You Put a Fence on a Slope?
Measure total drop and percent grade with stakes and a mason's line, then either rack the rails to follow the ground continuously or step each panel section down at a calculated uniform drop, setting every post plumb with extra footing depth on the downhill side.
What Type of Fence Is Best for a Slope?
Wood and chain-link adapt most easily to slopes because they're field-modifiable or naturally flexible, while vinyl and aluminum systems work well within their manufacturer's rack tolerance. A to Z Construction can size a vinyl fence installation to your specific grade to avoid tolerance issues.
Should I Fix Drainage Before Installing a Sloped Fence?
Yes. Addressing erosion and runoff before setting posts prevents the fence from acting like a dam and prevents repeated footing failures down the line.
When Should I Hire a Contractor Instead of DIYing a Slope Fence?
Call a licensed contractor when the grade is steep and irregular, when drainage or erosion issues appear during layout, or when a retaining wall needs to be engineered before the fence goes in.