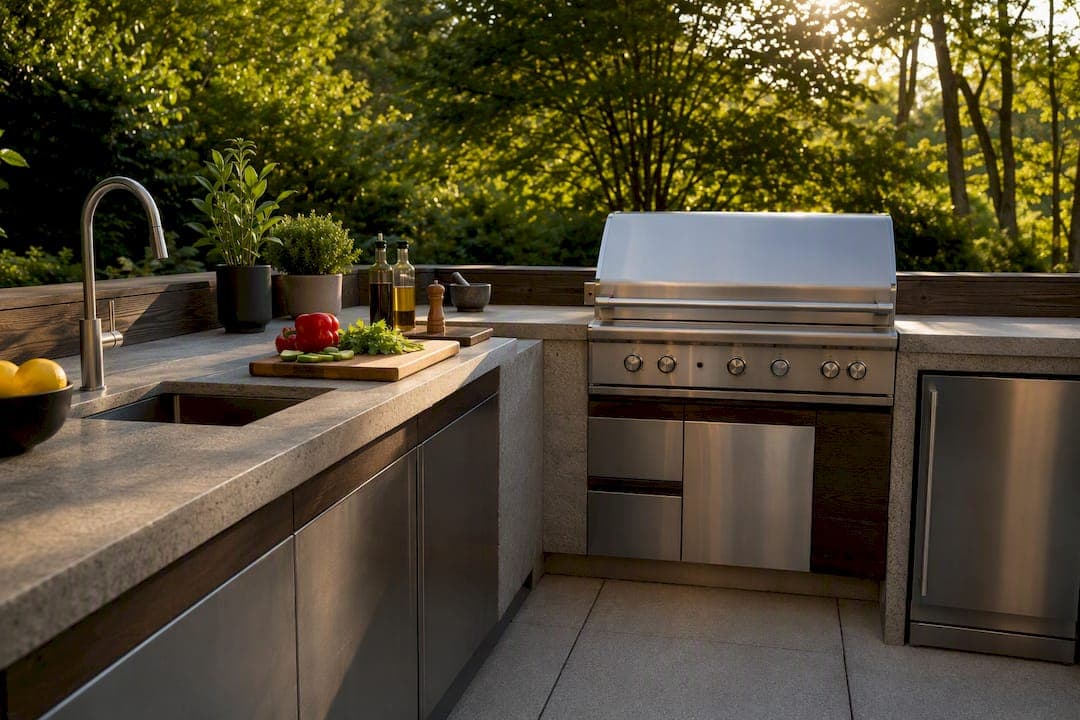
Five layouts cover almost every backyard: linear (straight-run), L-shape, galley, corner, and U-shape. A narrow side yard usually wants linear or corner; a patio built for entertaining leans L-shape; a dedicated cooking alley works as galley; and a big footprint with multiple cooks calls for U-shape. Whichever one fits your space, the first move isn't picking countertops. It's taping the actual layout on your patio in painter's tape and confirming where your gas, water, and electrical lines will land before you order a single appliance.
Here's the quick-reference version:
- Linear — one straight run, best for tight side yards or covered patios (6 to 12 feet)
- L-shape — the most popular layout for entertaining, adds a second work surface and bar seating
- Galley — a cooking corridor between two runs, best for serious cooks who want everything within arm's reach
- Corner — tucks into an existing patio corner without eating the whole yard
- U-shape — wraps three sides for multi-cook households and larger properties
Key Takeaways
Choosing an outdoor kitchen layout comes down to matching your footprint and cooking habits to one of five configurations, then locking utilities before ordering appliances.
| Point | Details |
|---|---|
| Five core layouts | Linear, L-shape, galley, corner, and U-shape cover nearly every yard and cooking style. |
| L-shape fits most entertainers | It balances counter space, cooking positions, and bar seating without a huge footprint. |
| Utilities come first | Mark gas, water, and electrical placement before ordering any appliance to avoid costly retrofits. |
| Tape-test before building | A full-scale taped layout on the patio catches clearance and door-swing conflicts for free. |
| Match materials to climate | Use 316 stainless near coastal exposure and outdoor-rated refrigeration everywhere. |
| A-to-zconstruction manages the full build | One licensed crew coordinates concrete, masonry, and utilities for outdoor kitchen projects in Utah. |
Table of Contents
- Outdoor Kitchen Layout Ideas Compared by Footprint and Function
- Choosing a Layout Based on Your Space and Cooking Style
- Planning Utilities, Ventilation, and Safety Clearances
- Materials and Appliances That Survive Outdoors
- Small-Space and Budget-Friendly Outdoor Kitchen Layouts
- What Contractors Learn From Building These on Real Jobsites
- Sources
- FAQ
Outdoor Kitchen Layout Ideas Compared by Footprint and Function
Picking a layout without measuring your footprint first is how homeowners end up with a beautiful island that blocks the back door. Each of these five layouts trades space for function differently, and the trade-offs matter more than the pictures on Pinterest suggest.
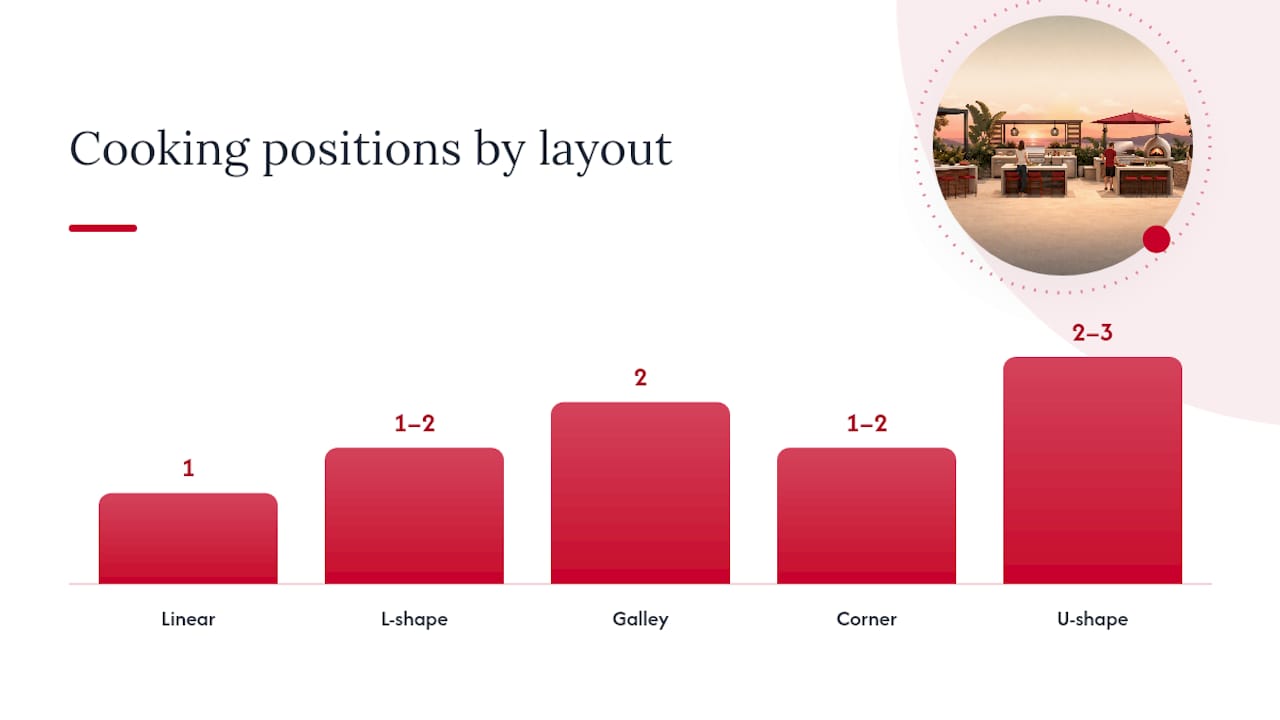
| Layout | Footprint Range | Cooking Positions | Counter & Storage | Social Factor | Weather Protection |
|---|---|---|---|---|---|
| Linear | 6–12 ft | 1 | Limited, single run | Low to moderate | Easy to cover with a simple roof line |
| L-shape | ~10x10 ft minimum | 1 to 2 | Moderate to high, plus bar seating | High | Works well under a pergola |
| Galley | 12–18 ft length | 2 | High, split across two runs | Low, cook faces away from guests | Needs full coverage due to length |
| Corner | 12 feet across | 1 to 2 | Moderate | Moderate | Fits under an existing patio roof |
| U-shape | 12x12 ft minimum | 2 to 3 | Highest | High, but needs more yard | Best under a dedicated pavilion |
These footprint ranges come from what actually fits without cramping walkways or forcing guests to squeeze past a hot grill.
Linear layouts are the easiest to build and the cheapest to cover, but you sacrifice a second work zone. If you're grilling for four people twice a month, that's not a real loss. If you're prepping a full meal from scratch every weekend, you'll feel the limitation fast.
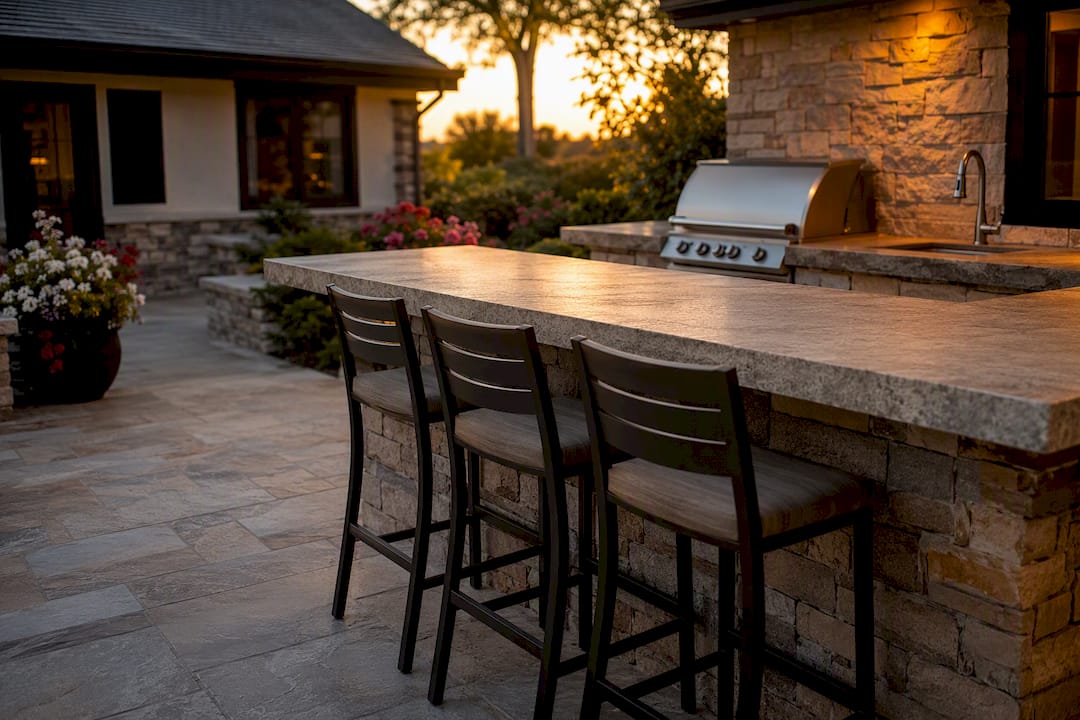
L-shape layouts win the popularity contest for a reason: the corner naturally creates a spot for bar seating, so your guests end up facing the cook instead of the cook's back. It's the layout most homeowners picture when they imagine an outdoor kitchen, and for good reason. It balances counter space, cooking capacity, and conversation without demanding a huge yard.
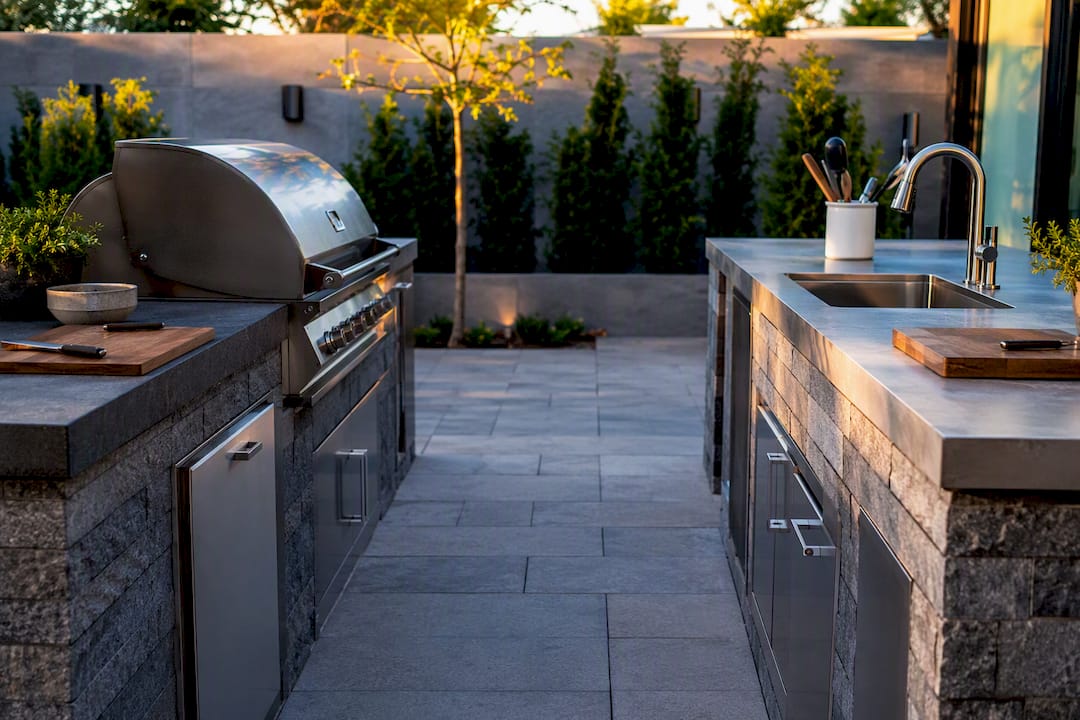
Galley layouts put function over socializing. Two parallel runs mean a prep station on one side and cooking on the other, which is fantastic for someone who actually cooks multi-course outdoor meals. The trade-off is that the cook's back is often to the party.
Corner layouts are the compromise pick for anyone retrofitting an existing patio. They tuck into a corner you're already not using and don't require reshaping your hardscape.
U-shape layouts need real square footage, but they're the only configuration built for two people cooking at once, plus enough perimeter for six or more guests to lean on the counter comfortably.
Choosing a Layout Based on Your Space and Cooking Style
Match the layout to how you actually live outside, not how you imagine you might someday entertain fifty people.
-
Small patio, occasional grilling — A linear or corner layout under 10 feet handles this without eating your yard. One cooking position is plenty if you're not running a griddle and a smoker simultaneously.
-
Frequent entertaining, moderate yard — L-shape is the sweet spot. Plan roughly 24 linear inches of bar seating per guest, so a four-person gathering needs about 8 feet of usable counter beyond the cooking zone.
-
Poolside kitchens — Corner or linear layouts keep sightlines open to the pool and reduce the footprint competing with deck space. Splash exposure also pushes material choices, which matters more here than layout shape.
-
Multi-cook households — If two people regularly cook together, a galley or U-shape gives each person a defined zone instead of one person hovering behind the other. Two cooking positions minimum, with at least 36 inches of clearance between them.
-
Large-scale entertaining, several times a year — U-shape layouts with a dedicated beverage station keep guest traffic from bottlenecking around the one person flipping burgers.
Counter space and seating scale roughly together: figure 2 linear feet of counter for every guest you expect to seat directly at the kitchen, on top of whatever counter your appliances already consume.
Planning Utilities, Ventilation, and Safety Clearances
This is the step homeowners skip and regret. Locking in gas, water, and electrical placement before you order appliances is the single biggest predictor of whether your build stays on budget. Retrofitting a gas line after the concrete is poured is one of the most expensive corrections in outdoor construction, and it happens constantly because someone fell in love with a fridge model after the slab went in.
Work through these before you finalize anything:
- Mark exact gas, water, and electrical stub locations on your plan, not just a general "somewhere over there"
- If the kitchen sits under a roof, pergola, or pavilion, size a hood to overhang the grill's cooking surface and rate it for the grill's total BTU output — open-air grills need no ducting at all
- Keep at least 36 inches of walkway behind any cooking line so two people can pass without contact
- Leave 18 to 24 inches of clear counter beside every grill for hot pans and utensils
- If the kitchen sits near a fire feature, apply the same clearance thinking you'd use for fire pit placement
Pro Tip: Tape or chalk your full-scale layout directly on the patio before you sign off on a design. It sounds low-tech, but it's the fastest way to catch a grill lid that swings into a walking path or bar stools that block the back door. Fixing it with tape takes five minutes; fixing it after the concrete cures does not.
Materials and Appliances That Survive Outdoors
An outdoor kitchen isn't an indoor kitchen with weather. Standard appliances fail outside because they're not built for it.
- Refrigeration: outdoor-rated units use weatherized compressors and sealed cabinets designed for hot ambient conditions — a standard indoor fridge will burn out its compressor within a season or two outdoors.
- Cabinetry: 304 stainless steel is fine for most inland climates; upgrade to 316 stainless near the coast, where chloride exposure causes pitting that 304 can't resist. That's a material spec decision, not an upsell.
- Countertops: porcelain and Dekton resist heat and staining with almost no sealing required; concrete looks striking but needs periodic resealing to avoid cracking in freeze-thaw climates.
- Support appliances: designers increasingly report that clients want features tied to how they actually cook, not default add-ons. A side burner earns its keep if you sauté regularly. A pizza oven only pays off if you use it more than a few times a season.
Cabinet material choice affects both your budget and your maintenance schedule for the life of the kitchen. For a deeper breakdown of finishes and long-term care, see this guide to outdoor kitchen cabinet materials.
Small-Space and Budget-Friendly Outdoor Kitchen Layouts
You don't need a full masonry build to get a functional outdoor cooking area. An 8-foot linear run with a built-in grill and a storage cabinet covers most weekend cooking needs, and it's the cheapest layout to execute correctly.
Prefab modular systems let you bolt together a grill module, a side burner, and a fridge cabinet without committing to permanent masonry, which matters if your budget or your plans might change in a few years.
A phased approach works well for most homeowners:
- Phase one: grill, closed storage cabinet, and a stretch of durable counter
- Phase two: add refrigeration once you know how often you'll actually use the space
- Phase three: a pizza oven or smoker, only if your cooking habits justify it
Skip built-in seating walls to save on hardscape cost. Freestanding furniture does the same job for a fraction of the price, and a rundown of typical line-item costs is worth reviewing before you commit to any outdoor kitchen budget.
What Contractors Learn From Building These on Real Jobsites
Sequencing utilities before ordering appliances isn't a suggestion. It's the difference between a project that stays on schedule and one that gets torn open twice. Crews that mark gas, water, and electrical stub-outs during the design phase, before a single block goes down, avoid the change orders that blow budgets.
Every jobsite has a moment where the tape-out reveals something the drawings missed: a grill door that swings into the walkway, a fridge that needs three more inches than the plan allowed, bar stools that crowd the gate. Catching it on tape costs nothing. Catching it in concrete costs real money.
Pro Tip: Ask whoever is building your kitchen to walk the taped layout with you before pouring anything. A second set of eyes on-site catches problems a floor plan never will.
Managing concrete, gas lines, electrical rough-in, and masonry finish work under one contractor also removes the coordination gaps that show up when three separate trades are scheduling around each other.
A Contractor's Field Note on Getting This Right
Homeowners consistently underestimate how much daily light changes a layout's usability. Walk your taped-out kitchen at both noon and dusk before you finalize anything. What looks shaded and comfortable at 2 p.m. can put the cook staring into a sunset by 6.
— Jake
Turn Your Outdoor Kitchen Layout Into a Built Reality
A-to-zconstruction handles the whole build under one crew, so you're not coordinating a concrete company, a gas line electrician, and a mason separately and hoping their schedules line up. That single-contractor structure is what keeps utility sequencing, hardscape pours, and masonry finish work from turning into the expensive rework this article just walked through.

A-to-zconstruction has completed over 500 residential and commercial projects across Utah, including custom outdoor kitchen builds that pair concrete work, masonry, and utility coordination in a single scope. If your project also involves covered structures, their team builds pergolas and decks that solve the weather-protection questions raised earlier in this guide. Ready to see numbers? Request a free hardscape estimate and get a real quote before you lock in appliances or countertops.
Sources
- Outdoor Kitchen Layouts: L-Shape, Linear, Galley & Corner
- How to design and build an outdoor kitchen
- Outdoor Kitchen Design: 18 Layouts & Ideas for Any Yard (2026)
- To design the dream outdoor kitchen, ask a chef
FAQ
What Is the Best Outdoor Kitchen Layout for a Small Yard?
A linear or corner layout under 10 feet is the most space-efficient option, giving you one full cooking position without consuming your whole patio.
How Much Space Do I Need for a U-Shape Outdoor Kitchen?
Plan for at least a 12x12 foot footprint, since U-shape layouts need room on three sides for cooking, prep, and guest circulation.
Do I Need a Hood for My Outdoor Kitchen?
Only if it's covered or enclosed. Open-air grills need no ducting, but any grill under a roof needs a hood sized to overhang the cooking surface and rated for its BTU output.
How Far Should Walkways Be From the Cooking Area?
Keep at least 36 inches of clearance behind any cooking line so two people can pass safely without bumping the grill.
Can I Build an Outdoor Kitchen in Phases?
Yes. Start with a grill and storage cabinet, then add refrigeration or a pizza oven later once you know how the space actually gets used. A-to-zconstruction can also phase a build within one coordinated project plan.