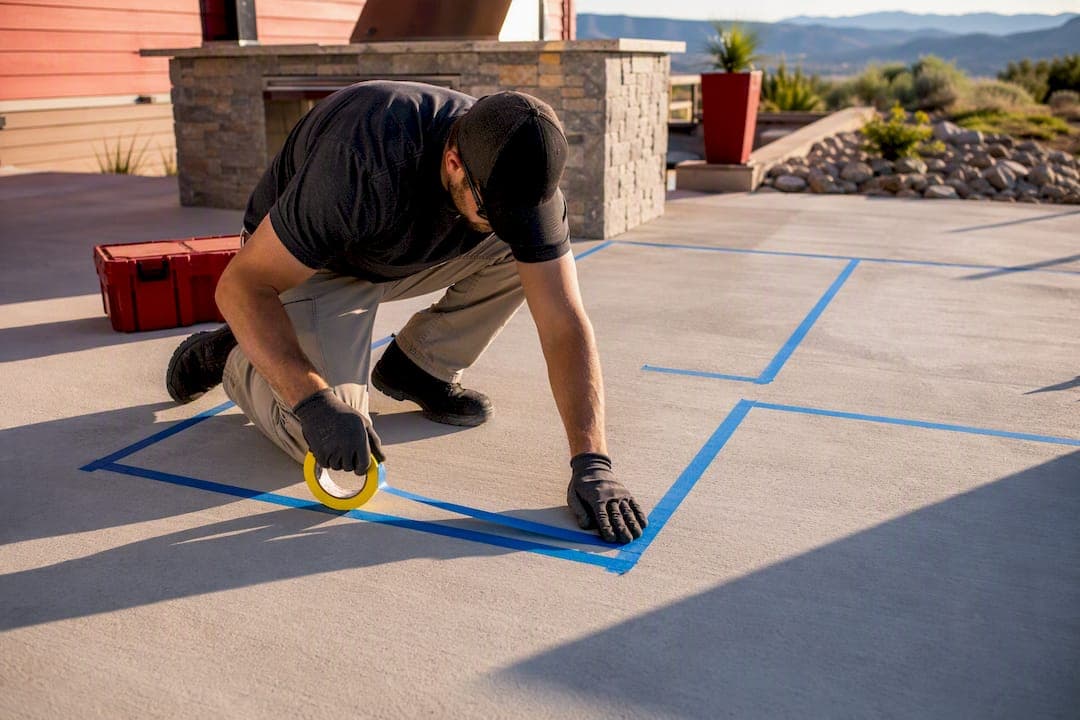
Most homeowners get the best mix of cooking space and social flow with an island or L-shape layout. A linear run works better for narrow patios, and a galley suits a covered kitchen you plan to use year-round. Whichever you lean toward, measure your footprint and utility lines before buying appliances, then tape the plan on the ground to confirm it works before you build it.
TL;DR:
- Lock in your layout, utility lines, and appliance dimensions before framing to prevent costly rework and installation issues during construction.
- A tape-out walk using painter’s tape helps verify appliance clearances, aisle widths, and seating space, catching problems early.
- The most versatile outdoor kitchen layouts include islands and L-shapes, which balance cooking capacity with social seating, depending on yard size.
- Durability relies on weather-resistant materials like Dekton countertops, marine-grade cabinets, and stainless steel appliances, especially in high-humidity or coastal areas.
- Proper ventilation for covered kitchens and inclusive design features, such as lower counters and wider walkways, are key to safety, comfort, and long-term functionality.
Table of Contents
- Outdoor Kitchen Layout Types: Which Footprint Fits Your Yard
- Zones, Work Triangles, and the Clearances That Keep You From Bumping Elbows
- How to Choose the Right Layout for Your Yard
- Three Sample Plans You Can Tape Out This Weekend
- Materials and Weather Protection That Actually Hold Up
- Common Layout Mistakes and Quick Fixes
- From a Contractor: What to Expect on a Real Build
- Fitting Seating and Dining Into Your Layout
- Storage and Cabinetry That Survive Outdoor Conditions
- Ventilation and Smoke Management
- Accessibility and Universal Design in Outdoor Kitchens
- Why the Standard Outdoor Kitchen Advice Skips the Hard Part
- Get a Free Estimate Before You Buy a Single Appliance
- Sources
- FAQ
Outdoor Kitchen Layout Types: Which Footprint Fits Your Yard
Six layouts cover almost every backyard, and each one solves a different space problem. Picking the right family first saves you from redesigning around a grill you already bought.
A linear layout puts everything on one wall, typically running 6 to 12 feet. It fits narrow side yards and small patios where depth is the constraint, though it limits how many people can cook at once. An L-shape wraps around a corner, needs roughly a 10x10 foot footprint minimum, and creates a natural bar edge for guests without eating up the whole yard, a big reason designers reach for it when entertaining matters. A galley runs two parallel counters 12 to 18 feet apart, works best under a roof, and gives you the most cooking capacity in a compact, weather-protected footprint.
A corner layout tucks into a 9 to 12 foot angled space and suits yards where a patio meets a fence line at an angle. U-shape kitchens need 12x12 feet or more and support multiple cooks, but they're the most expensive to frame and plumb. Island layouts stand alone in open patios, offer 360-degree access, and scale from a single grill station to a full outdoor kitchen with sink and fridge, depending on how much footprint you give them.
| Layout | Typical footprint | Best for |
|---|---|---|
| Linear | 6–12 ft run | Narrow patios, single cook |
| L-shape | ~10x10 ft min | Entertaining, natural bar seating |
| Galley | 12–18 ft | Covered, year-round cooking |
| Corner | 9–12 ft across | Angled patios, fence corners |
| U-shape | 12x12 ft min | Large families, multiple cooks |
| Island | Varies, open patio | Freestanding, flexible scale |
Zones, Work Triangles, and the Clearances That Keep You From Bumping Elbows
Professional designers plan outdoor kitchens around four functional zones: hot (the grill and any side burners), cold (refrigeration), wet (sink and bar), and dry (prep and counter space). Keeping these zones close enough to reach without crossing a busy walkway is the single biggest factor in whether a layout actually feels good to cook in, a principle outdoor kitchen designers apply consistently.
The classic kitchen work triangle still applies outside, just compressed. Grill, fridge, and sink should form a rough triangle so you're not walking the length of the island for every step of a meal.
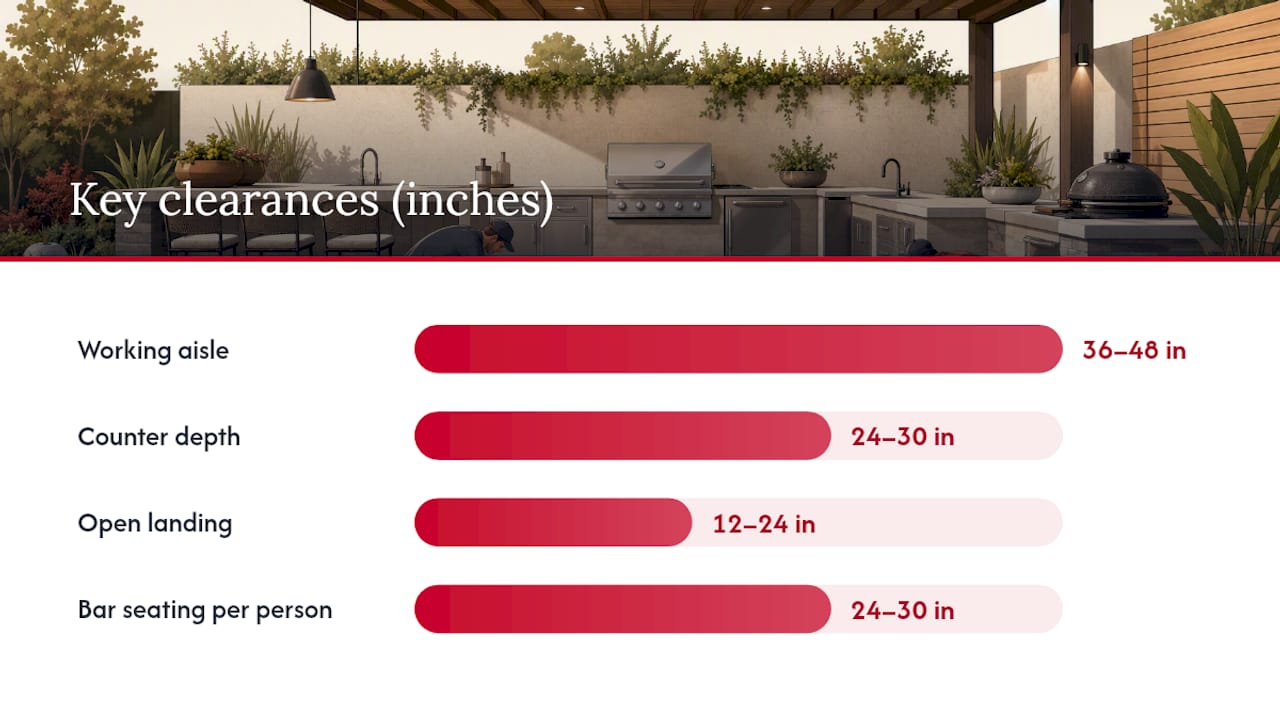
Clearances matter more than most homeowners expect:
- Working aisle behind the cooking line: 36 to 48 inches, with 42 to 48 inches preferred if two people cook at once.
- Counter depth: 24 to 30 inches.
- Open landing space beside the grill: 12 to 24 inches minimum, so hot pans have somewhere to go.
- Bar seating: 24 to 30 inches of width per person.
These figures come from ergonomic guidance widely used in outdoor kitchen design, and they hold whether you're building a small linear run or a sprawling U-shape. Always keep the grill's manufacturer clearance intact, and if the kitchen sits under a roof, plan ventilation before you frame it.
How to Choose the Right Layout for Your Yard
Work through this in order, not the order most people default to, which is picking a grill first and hoping the layout follows.
- Measure the actual footprint. Note the patio's shape, nearby doors, windows that shouldn't face smoke, and any existing gas or water lines.
- Decide how you cook. One person grilling burgers needs a different layout than two people running a full outdoor dinner service.
- Pick appliances and lock model numbers before framing. Grill width, fridge depth, and sink size determine your island dimensions and utility routing, not the other way around.
- Match your situation to a layout family: tight patio, go linear; want a serving bar, go L-shape; cooking year-round under cover, go galley; big group, consider U-shape or a large island.
- Tape the plan on the ground. Use painter's tape or chalk to mark the island perimeter and every appliance footprint, then walk it with a tray in hand.
Pro Tip: Simulate opening every appliance door and pulling out every drawer during your tape-out walk. This is the cheapest moment to catch a fridge door that swings into a walking path, and it costs you nothing but an afternoon.
This tape-out method catches problems no floor plan on paper ever will.
Three Sample Plans You Can Tape Out This Weekend
Numbers on a page rarely translate the way you expect once appliances are sitting on grass. Here are three dimensioned starting points, sized small, medium, and large.
Small (linear, single cook): An 8 to 10 foot run with a 36-inch grill, 24 to 30 inches of prep counter, a 12 to 18 inch landing zone, and a 42-inch aisle behind you. This fits most standard patios and covers a straight island build.
Medium (L-shape, entertaining): A 10x10 foot minimum footprint with the grill on the primary leg and fridge plus sink on the secondary leg. Add bar seating along the outer edge at 24 to 30 inches per seat.
Large (U-shape or galley, multiple cooks): A 12x12 foot or larger footprint with multiple cooking positions, dual sinks, and bar seating wrapped around two or three sides.
| Plan size | Layout | Kitchen-only cost range |
|---|---|---|
| Small | Straight island | a kitchen-only cost range from lower to moderate costs |
| Medium | L-shape | a kitchen-only cost range from moderate to mid-range costs |
| Large | U-shape with bar | $45,000–$80,000+ |
These cost ranges are rough estimates for the kitchen structure alone, excluding shade, lighting, and patio surface. To tape out any of these, mark the corners first, add your clearance zones on top, then simulate opening doors and seating before you commit to a single cut of concrete.
Materials and Weather Protection That Actually Hold Up
Outdoor conditions are hard on materials that look identical to indoor options at the showroom. Choosing the wrong slab or cabinet box now means replacing it in three years.
- Countertops: Dekton, porcelain, or granite resist UV fading and freeze-thaw cracking far better than indoor-grade quartz.
- Cabinets: Powder-coated aluminum or marine-grade polymer shrug off rain and humidity; untreated wood and particleboard don't.
- Appliances: Stainless steel remains the standard for a reason. It resists corrosion, especially near coastal or high-humidity climates.
- Shade structures: Plan the roof or pergola alongside the kitchen layout itself, not as an afterthought, since poor planning here leads to smoke buildup and accelerated corrosion.
Wipe down stainless surfaces regularly and reseal stone countertops annually to keep finishes looking new. For a deeper breakdown of cabinet material choices and upkeep, A-to-zconstruction's guide on outdoor kitchen cabinet materials and care walks through the trade-offs, and a maintenance-focused cleaning guide covers when a quick DIY wipe-down isn't enough and it's time to call a pro.
Common Layout Mistakes and Quick Fixes
Most outdoor kitchen regrets trace back to a handful of repeat offenders.
- Buying the grill after the island is framed. Fix: lock every appliance model number first. Appliance dimensions drive the entire layout, not the reverse.
- Skipping the tape-out test. Fix: mark the full footprint on-site before ordering materials, even for a small linear run.
- Cramming the aisle below 36 inches. Fix: widen the walkway now. Retrofitting an aisle after concrete is poured is expensive.
- Ignoring gas, electrical, or venting requirements. Fix: call a licensed contractor for anything involving gas lines, 220V circuits, or covered-structure ventilation. This isn't a DIY category where guessing is cheap.
From a Contractor: What to Expect on a Real Build
A-to-zconstruction has completed over 500 projects across concrete, hardscape, and outdoor living builds, and outdoor kitchens are where poor sequencing shows up fastest. A typical build coordinates concrete flatwork, gas and electrical rough-in, masonry or veneer, and cabinetry, usually across two to four weeks once utilities are confirmed. Locking appliance cutouts and utility routing before finishing the island is the single biggest lever against change orders and schedule slips. Handling every phase in-house removes the coordination gaps that stall projects run through multiple subcontractors.
Fitting Seating and Dining Into Your Layout
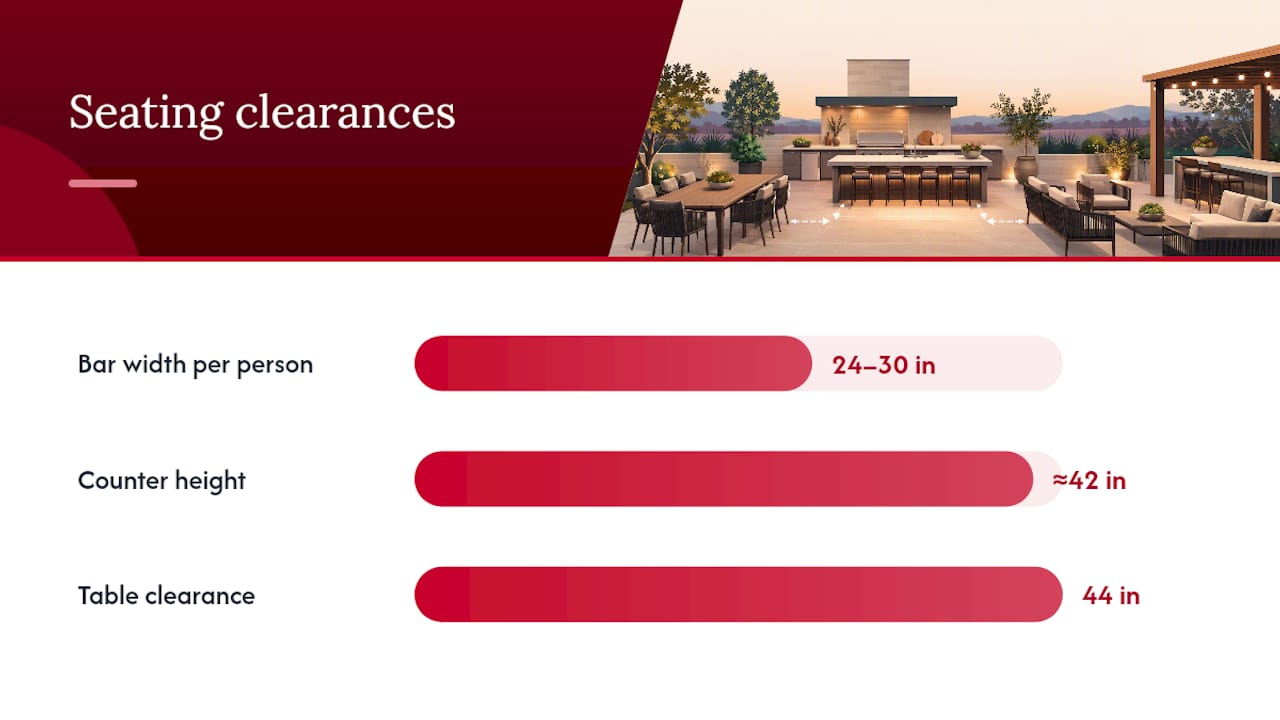
A kitchen without a place to sit down and eat isn't really finished, and seating decisions shape the layout more than most homeowners plan for upfront. Bar seating built into an L-shape or island edge is the most space-efficient option, running 24 to 30 inches of width per person along a counter roughly 42-inch high for standing-height bars.
For a separate dining table instead of bar stools, keep at least 44 inches of clearance between the cooking counter and the table's edge so servers and diners can pass without squeezing past a hot grill. This is wider than the standard aisle clearance behind the cook, and it's worth the extra square footage if you regularly host groups larger than four.
Covered galley kitchens often integrate a small dining nook directly under the same roof, which extends usability into cooler months and keeps food from getting cold on the walk from grill to table. Open island layouts, by contrast, usually work better with dining set slightly off to the side, connected but visually distinct, so the cooking zone doesn't double as a walkway during dinner.
Whichever direction you go, decide on seating capacity before finalizing your footprint. Adding four bar stools to an already-tight L-shape after the concrete is poured is one of the more common regrets homeowners run into, right alongside undersized aisles.
Storage and Cabinetry That Survive Outdoor Conditions
Storage in an outdoor kitchen isn't optional, and it isn't the same problem as indoor cabinetry. Humidity, temperature swings, and pest access all work against materials that would last decades inside a house.
Drawer-based storage under the counter handles utensils, towels, and small tools better than cabinets with doors, since drawers seal more consistently against moisture and dust. Reserve at least one weatherproof cabinet for trash and recycling near the prep zone, and keep propane tank storage in a ventilated cabinet away from any ignition source, a detail that trips up more homeowners than it should.
Powder-coated aluminum and marine-grade polymer resist warping and rust far better than standard outdoor-rated wood, which still absorbs moisture over multiple seasons even when sealed. Stainless steel drawer boxes handle temperature swings without the expansion and contraction that eventually cracks lesser materials.
Plan cabinetry depth to match your counter depth, generally 24 to 30 inches, so storage doesn't create an awkward overhang or a gap you can't reach into. A-to-zconstruction's breakdown of cabinet materials and care covers which finishes hold up in different climates if you want to go deeper before choosing.
Ventilation and Smoke Management
Open-air island kitchens rarely have a smoke problem, since wind and open sky handle dispersion on their own. Covered kitchens are a different story, and this is where a lot of otherwise well-planned layouts go wrong.
Any roofed structure over a grill needs a real ventilation plan, not just an open side or two. A vented hood or a roof design with adequate rise above the grill head keeps smoke from pooling under the structure and staining the ceiling material over time. Planning the shade structure and the kitchen layout together, rather than adding a roof after the kitchen is built, avoids the retrofit problems that come with cutting ventilation into an already-finished patio cover.
Position the grill so prevailing wind carries smoke away from seating and dining areas rather than through them, something easy to check during your tape-out walk by simply noting which direction the breeze tends to move on a normal evening. If you're pairing a kitchen with a dedicated patio cover, a patio cover or gazebo build designed alongside the kitchen gives you more control over vent placement than adding shade as an afterthought.
Accessibility and Universal Design in Outdoor Kitchens
An outdoor kitchen built for one set of knees and one height of countertop stops working the moment a guest, aging parent, or future version of you needs something different. Universal design principles handle this without making the space feel clinical.
Counter heights around 34 to 36 inches accommodate most standing cooks and wheelchair users better than the taller 42 inch bar height, though you can mix both if seating and cooking zones are separate. Keep at least one clear path 36 inches wide from the patio entrance to the main cooking zone, wider than a typical walkway, to accommodate a wheelchair, walker, or simply a server carrying a full tray.
Lever-style faucet handles and D-shaped cabinet pulls are easier to operate with limited grip strength than round knobs, and they cost little more at the time of install. Placing at least one section of counter at a lower height, even a 30 inch stretch near the prep zone, gives seated cooks a workable surface without redesigning the whole island.
None of this requires abandoning the layouts already covered. An L-shape or island simply needs its clearances built to the wider end of the ranges discussed earlier, which costs a little more square footage now and saves a full renovation later.
Why the Standard Outdoor Kitchen Advice Skips the Hard Part
Most guides jump straight to appliances and finishes because that's the fun part to shop for. The layout gets treated as an afterthought, which is backwards. Utilities, framing, and clearances are permanent. A different grill brand is not.
The conventional wisdom of "pick your dream grill and build around it" causes more expensive rework than almost any other outdoor kitchen mistake. Lock the footprint, the zones, and the clearances first. Appliance shopping comes after, once you know exactly what dimensions you're filling.
If there's one habit worth stealing from a contractor's checklist, it's the tape-out walk. It costs an afternoon and a roll of painter's tape, and it catches the aisle that's six inches too narrow or the fridge door that swings into the walkway, problems that are cheap to fix on grass and expensive to fix in poured concrete. Homeowners who skip this step are the ones calling contractors mid-build asking why the layout feels cramped.
Prioritize the plan. The appliances will fit whatever smart footprint you build for them.
— Jake
Get a Free Estimate Before You Buy a Single Appliance
A-to-zconstruction handles outdoor kitchen builds the way this guide recommends: layout and utilities locked before appliances go in the cart. As a licensed general contractor running concrete, gas, electrical, and masonry crews in-house, there's no juggling separate subcontractors or waiting on someone else's schedule to move your project forward.

A free estimate includes a site visit, help taping out your layout options against your actual patio, and a phased budget so you know what the kitchen costs versus the shade structure and patio surface around it. If your project also touches foundation work or structural changes, A-to-zconstruction's structural remodeling services cover that too. Start with a free hardscape estimate and find out what your yard can actually support.
Sources
For layout ideas, see 5 outdoor kitchen layout ideas; for budgeting, see the outdoor kitchen cost breakdown; for the full build service, visit A-to-zconstruction's outdoor kitchens page.
- Outdoor kitchen layouts: L-shape, linear, galley & corner — Range
- Designing outdoor kitchens | Danver
- 12 steps to designing your outdoor kitchen | Yale Appliance blog
- Maximizing functionality: Outdoor kitchen layouts that work for your space — Lifetime Enclosures
FAQ
What is the best layout for an outdoor kitchen?
An island or L-shape works best for most homeowners because it balances cooking space with social seating. Choose linear for narrow patios and galley if the kitchen will be covered and used year-round.
What are common outdoor kitchen mistakes?
The biggest mistakes are buying appliances before finalizing the layout, skipping the tape-out test, and building aisles narrower than 36 inches. Locking appliance model numbers before framing prevents most of the costly rework homeowners run into.
What are the outdoor kitchen trends for 2026?
Covered galley kitchens with integrated ventilation planning, universal design touches like lower counter sections, and durable materials such as Dekton and powder-coated aluminum are shaping current builds. Homeowners are also planning shade structures and kitchens together rather than adding a roof afterward.
Is it cheaper to build or buy an outdoor kitchen?
A prefabricated modular kitchen can cost less upfront than a fully custom build, but custom layouts built to your exact footprint and clearances usually hold up better and avoid retrofit costs. Kitchen-only ranges run roughly $15,000 to $30,000 for a straight island up to $45,000 to $80,000 or more for a U-shape with bar seating, and working with a licensed contractor like A-to-zconstruction keeps utility and framing costs predictable from the start.