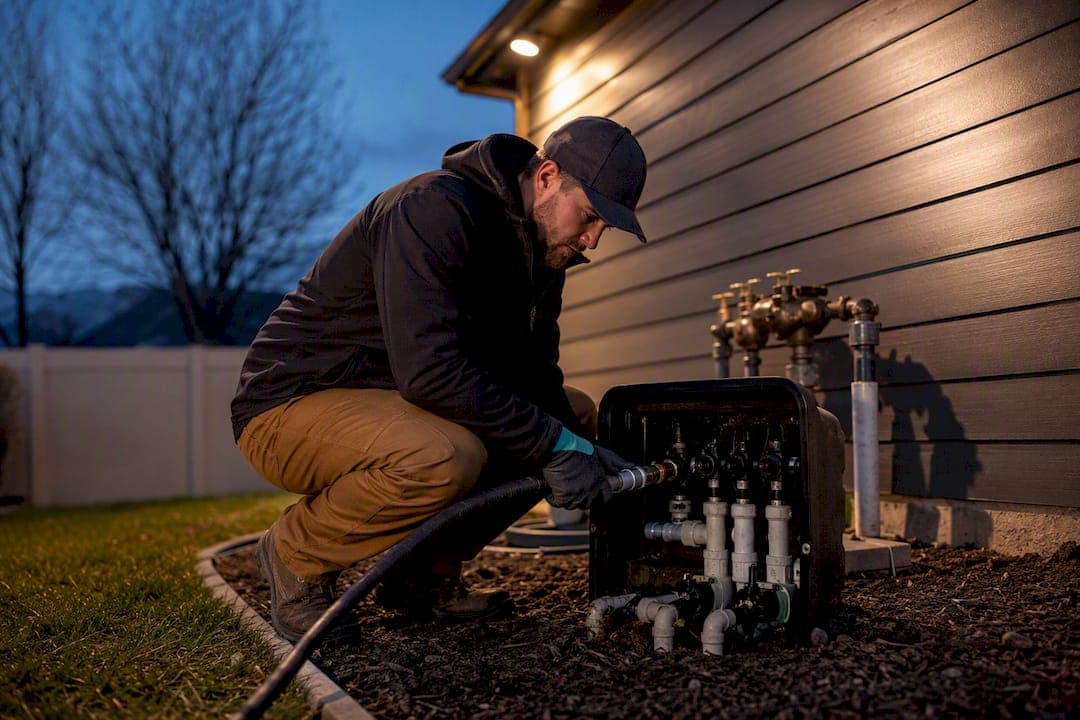
If frost reaches the depth of your buried irrigation pipes, you need to winterize, and compressed-air blowout is the method licensed contractors trust most in true freeze zones. Right now, before you read another word, switch your controller to "off" or "rain" mode, and shut the main irrigation supply valve. If you're not confident handling an air compressor safely, call a pro instead of guessing.
TL;DR:
- Using a compressor with sufficient airflow (CFM) is critical; a high PSI rating alone does not guarantee effective water removal.
- Automatic and manual drains are secondary safeguards; a proper blowout with air is the most reliable method in truly cold climates.
- Always connect the compressor downstream of the backflow preventer and keep pressure between 40 to 60 PSI to avoid damaging fittings or heads.
- Insulate above-ground components and drain backflow devices correctly, never blow compressed air directly through pressure vacuum breakers or reduced-pressure assemblies.
- Hiring a licensed professional ensures correct compressor sizing, proper backflow protection, and reduces the risk of costly freeze damage.
Table of Contents
- What's On a Sprinkler Winterization Checklist?
- Manual Drain, Automatic Drain, or Blowout: Which One Actually Works?
- How Do You Safely Blow Out a Sprinkler System?
- How Do You Protect Backflow Devices and Valves?
- When Should You Winterize and What Does It Cost?
- How Do You Start Your Sprinkler System Back Up in Spring?
- What Do Contractors Actually Look for During Winterization?
- What the Instructions Skip
- Need a Contractor to Handle Winterization This Fall?
- Where This Guidance Comes From
- Sources
- FAQ
What's On a Sprinkler Winterization Checklist?
A full winterization job is really four short tasks. Skip one and you're gambling on a cracked pipe come March.
- Turn the controller to off or rain mode, and unplug it if the manufacturer recommends that for your model.
- Locate and close the stop-and-waste or isolation valve that feeds your irrigation system.
- Drain any visible above-ground piping by hand, then wrap or insulate exposed valves and backflow components.
- Decide whether to rent a compressor yourself or hire a contractor. Rental typically runs $50 to $80, while a pro blowout usually costs more, but removes the guesswork.
That last decision matters more than it sounds. A lot of homeowners rent a compressor once, realize halfway through that they don't have the CFM they need, and end up calling a contractor anyway.
Manual Drain, Automatic Drain, or Blowout: Which One Actually Works?
Three methods handle winterization, and they're not interchangeable.
- Manual drain valves rely on gravity. You open valves at the low points of your system and let water run out. It works only if your pipes were installed with consistent downward pitch toward those drain points. Most residential systems settle unevenly over the years, which creates pockets where water sits and freezes.
- Automatic drain valves trigger when internal pressure drops below a threshold. Convenient, but they're a poor standalone solution because they can still leave water trapped in low spots the valve simply doesn't reach.
- Compressed-air blowout forces water out of the entire pipe network using air pressure. It's the most reliable technique in cold climates, but it demands the right pressure, the right air volume, and a compressor connected downstream of your backflow preventer.
Colorado State University Extension notes that manual and automatic drains should be treated as secondary safeguards, not primary defenses, in regions where ground frost regularly reaches pipe depth. Buried lines shift slightly over time from soil movement and frost heave, which throws off the pitch a manual drain depends on.
The most common mistake? Homeowners run a manual drain, assume the system is empty, and skip the blowout entirely. Then a hard freeze hits, the water nobody could see refreezes and expands, and a fitting splits underground where you won't find it until spring, when a sprinkler head sprays like a fountain instead of watering the lawn.
Neglecting winterization altogether can lead to repair bills upwards of $500, and that's often just for one damaged zone.
How Do You Safely Blow Out a Sprinkler System?
Get the order of operations right, and blowout is straightforward. Get it wrong, and you risk blowing a seal or hurting yourself.
- Shut off the water supply to the irrigation system and relieve any residual pressure in the lines.
- Connect your compressor downstream of the backflow preventer, never upstream. Forcing air through the device's internal seals can damage them.
- Size your compressor correctly. Take your highest zone's GPM (gallons per minute, listed on your controller or sprinkler heads) and divide by 7.5 to estimate the CFM you actually need. Volume matters more than peak pressure here. A small pancake compressor rated for high PSI but low CFM will not clear water from a multi-zone system.
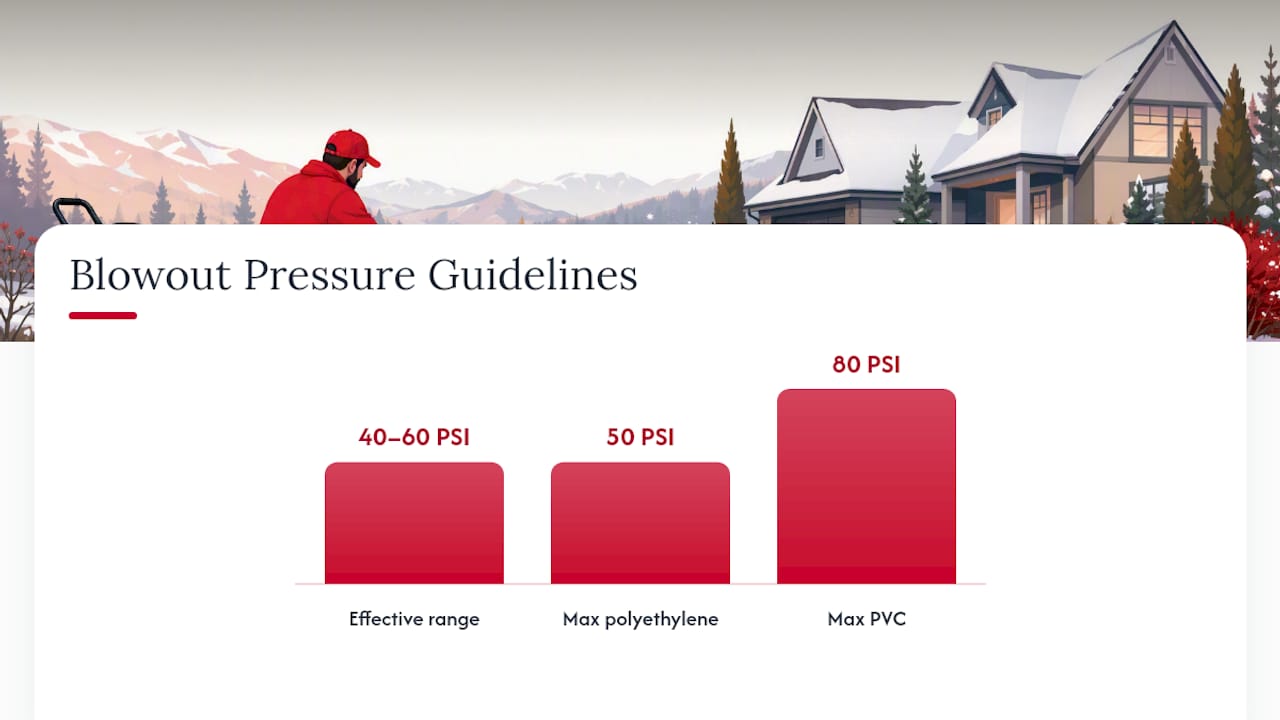
- Set pressure in the effective range of 40 to 60 PSI. Never exceed 80 PSI for PVC piping or 50 PSI for polyethylene. Higher pressure doesn't clear water faster. It just risks cracking fittings or blowing a sprinkler head off its riser.
- Start with the zone farthest from the compressor and work your way back. Run each zone in short cycles of one to two minutes rather than one long blast, and stop as soon as only a fine mist appears at the heads.
Compressed air heats up as it moves through pipe, so connect to metal fittings where you can to help dissipate that heat, and never stand directly over an active pop-up head while it's clearing. Wear ANSI-rated eye protection every time. Debris and mist exit those heads at real velocity.
Pro Tip: If your system uses plastic-geared rotary sprays, don't leave those zones running on air alone for long stretches. The gears rely on water for lubrication, and dry-running them for too long wears them out faster than a whole winter of normal use.
How Do You Protect Backflow Devices and Valves?
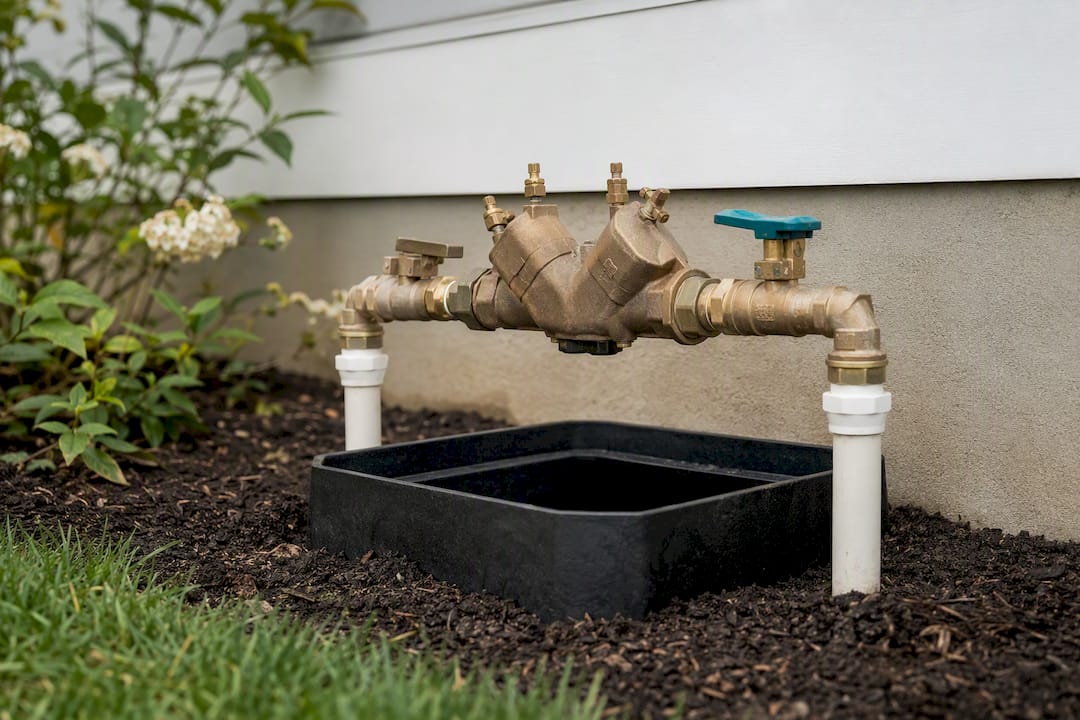
The single costliest blowout mistake is treating the backflow preventer like just another pipe. Never blow compressed air through a pressure vacuum breaker (PVB) or reduced-pressure (RP) assembly. University irrigation programs are explicit about this: those devices need to be drained separately, using their own test cocks and isolation valves, not force-cleared with air.
Here's the sequence that actually protects your system over winter:
- Open the test cocks on your backflow device and let it drain naturally on its own.
- Leave isolation ball valves half open rather than fully closed. Fully closed valves can trap water in the body of the valve itself, and that water freezes and cracks the housing.
- Drain any flow sensors and pull sensitive electronics if your manual recommends it.
- Insulate every above-ground component, pipes, valves, and the backflow assembly, with foam pipe insulation or an insulated cover rated for outdoor winter use.
If any of this feels uncertain, put it in writing as part of a contractor's scope of work rather than guessing at test cock positions on a $200 brass assembly.
When Should You Winterize and What Does It Cost?
Time it to the weather, not the calendar. Winterize before the first sustained hard freeze, meaning consecutive nights holding below 32°F, and check local long-range forecasts alongside your USDA hardiness zone to judge how much runway you have.
- DIY route: compressor rental runs about $50 to $80, and the job itself takes 30 to 60 minutes the first time through.
- Hiring a pro: typical rates fall between $75 and $150 depending on system size and whether spring startup is bundled in.
In genuinely cold climates, that price gap barely matters once you weigh it against the repair risk. A pro brings a properly sized compressor and knows to protect your backflow device without being told twice.
How Do You Start Your Sprinkler System Back Up in Spring?
Close every test cock and ball valve before you pressurize anything, then open the main supply valve slowly, not all at once. A sudden rush of water into empty pipes causes water hammer, a pressure spike that can crack fittings that survived the whole winter intact.
Pressurize one zone at a time and watch closely for leaks or weak spray patterns. If you find a visible pipe break, a leak you can't isolate, or a valve that won't budge, shut the system down again and call a contractor before you flood your yard trying to force it.
What Do Contractors Actually Look for During Winterization?
A licensed general contractor based in Cedar City, Utah, has completed numerous residential and commercial projects, including irrigation and landscaping work suited to Utah's freeze cycles. That volume of work exposes a pattern fast: most winterization failures trace back to undersized compressors or someone blowing air straight through a backflow device.
Hiring a pro buys you the right CFM, correct backflow protection, and someone who knows local code. Before hiring anyone, ask for a written estimate and direct confirmation that they will not blow compressed air through your PVB or RP assembly.
What the Instructions Skip
Most winterization guides fixate on PSI and barely mention CFM, and that's backward. A compressor that hits 90 PSI but can't sustain airflow will leave water sitting in your low spots exactly where it does the most damage, right at pipe joints and fittings underground where you won't see the crack until a wet patch shows up on your lawn in March.
The other thing conventional advice underplays: manual and automatic drains aren't really winterization methods in cold climates. They're a false sense of completion. If you've got buried lines in a region with real frost depth, treat drains as a backup step, not the plan.
What should you prioritize first? Get the CFM math right before you touch the PSI dial, and settle the backflow device question before you turn on a compressor at all. Everything else, insulation, valve positioning, timing, is secondary to those two decisions. If you're unsure about either one, that uncertainty itself is the answer to whether you should call a contractor.
— Jake
Need a Contractor to Handle Winterization This Fall?
A licensed, in-house crew can handle the blowout, protect your backflow assembly correctly, and return in spring for startup, all coordinated through a single point of contact instead of juggling separate vendors. That matters most in Utah's freeze-thaw swings, where a poorly sized DIY blowout can cost more in spring repairs than the service would have.

If your system already shows signs of past freeze damage, or you'd rather not learn compressor sizing under a tight weather window, A to Z Construction's irrigation and sprinkler services cover both fall winterization and spring startup. Request a free irrigation estimate and get a scheduled date on the calendar before the first hard freeze locks in.
Where This Guidance Comes From
This guidance draws on extension research from Colorado State University and Texas A&M's School of Irrigation, manufacturer safety notes from Hunter Industries, and procedural detail from Home Depot. For related freeze-damage repair context, see this frozen water line guide.
Sources
- Home Sprinkler Systems: Preparing Your Sprinkler System for Winter | Colorado State University Extension
- Winterization - School of Irrigation - Texas A&M University
- Winterizing Your Irrigation System | Hunter Industries
- How to winterize your sprinkler system | The Home Depot
FAQ
Can I winterize my sprinkler system myself?
Yes, if you can rent a properly sized air compressor and follow correct PSI limits. Homeowners without compressor access or confidence around backflow devices should hire a licensed contractor instead.
Does a sprinkler system need to be winterized?
Yes, if soil frost in your area reaches the depth of your buried piping. Skipping it risks freeze damage that can cost upwards of $500 to repair.
How do I winterize my sprinkler valve?
Drain backflow-prevention valves using their own test cocks rather than compressed air, and leave isolation ball valves half open through winter to prevent trapped water from cracking the housing.